# Adaptive Health AI - Complete Platform Documentation > HIPAA-compliant AI chatbot platform for healthcare organizations. > This file contains the full documentation for the Adaptive Health AI platform. > For the structured index, see: https://adaptivehealthai.com/llms.txt > Website: https://adaptivehealthai.com > Support: support@adaptivetelehealth.com --- # Module 1.1: Platform Overview ## 1.1.1 What is Adaptive Health AI? Adaptive Health AI is a HIPAA-compliant AI chatbot platform built for healthcare organizations. The platform lets hospitals, clinics, telehealth providers, and healthcare systems deploy intelligent chatbots that answer visitor questions, capture leads, and connect visitors with your team when needed. ### The Problem We Solve Healthcare organizations face significant challenges in patient communication: - **High call volumes**: Front desk staff are overwhelmed with routine inquiries - **After-hours gaps**: Patients need information outside business hours - **Repetitive questions**: Staff spend hours answering the same questions daily - **Resource constraints**: Limited budget for 24/7 support staff - **Compliance requirements**: All communications must maintain HIPAA compliance ### Our Solution Adaptive Health AI addresses these challenges by providing: - **AI-powered chatbot** that understands and responds to visitor questions using your own content - **Custom training** on your organization's documents and website content - **24/7 availability** without additional staffing costs - **Live Agent Support** so your team can step in when personal attention is needed - **HIPAA-compliant infrastructure** hosted on AWS SOC 2 Type II certified infrastructure ### Who Uses Adaptive Health AI? - **Hospitals and health systems** -- Automate patient inquiries across departments - **Private practices and clinics** -- Virtual front desk assistant - **Telehealth providers** -- Pre-visit screening and technical support - **Mental health practices** -- Resource distribution and appointment assistance - **Specialty care centers** -- Procedure education and appointment preparation --- ## 1.1.2 What You Get When You Sign Up ### AI Chatbot for Your Website Deploy an AI-powered chatbot widget directly on your website. Visitors can ask questions and get instant answers based on the content you provide. The widget supports three deployment options: - **Script Tag** -- A single line of code added to your website - **iFrame** -- Embed the chatbot in a specific area of a page - **Popup** -- Launch the chatbot from a button or link ### Train Your Chatbot Upload your own content to teach your chatbot what to say. Supported training sources include: - **Document uploads** -- PDF, DOCX, TXT, and Markdown files - **Website crawling** -- Automatically pull content from your existing website ### Q&A Overrides Set exact answers to specific questions. When a visitor asks a question that matches an override, the chatbot responds with your predetermined answer instead of generating one from training content. ### Analytics Dashboard Track how your chatbot is performing with built-in analytics: - Total conversations and messages - Visitor counts - Response times - Usage trends over time ### Lead Capture Forms Collect visitor contact information directly through the chatbot. Configure a lead capture form to gather names, emails, phone numbers, and other details from visitors who want to be contacted. ### Conditional Buttons Add smart action buttons that appear in the chatbot based on the conversation context. Use these to guide visitors to scheduling pages, contact forms, specific resources, or any URL relevant to their question. ### Live Agent Support **Paid add-on -- $49/month** Allow your team members to chat directly with visitors in real time. When the chatbot cannot fully address a visitor's needs, your team can step in and take over the conversation. ### Sandbox Testing Environment Test your chatbot before deploying it to your website. The sandbox provides the same chat experience your visitors will see, so you can verify responses and fine-tune your training content. ### Team Management Invite team members to your organization and control what they can access using permission profiles. Assign different roles so the right people can manage chatbots, view conversations, handle leads, or configure settings. ### Multi-Chatbot Support Create and manage multiple chatbots within a single account. Use different chatbots for different purposes, departments, or websites. ### Widget Customization Match the chatbot to your brand: - Primary and secondary colors - Custom logo - Widget position on the page - Light and dark themes - Custom welcome message and suggested questions ### Email Notifications Stay informed with automated email notifications: - Conversation summaries - Lead alerts when visitors submit contact information - Daily digest reports ### Support Hours Scheduling Configure the hours when your team is available for live support. Visitors see when live agents are available and when they can expect a response. ### Security and Compliance | Feature | Description | |---------|-------------| | **HIPAA Compliance** | Full compliance with healthcare data regulations | | **Business Associate Agreement** | BAA included with all plans | | **AWS Infrastructure** | Hosted on AWS SOC 2 Type II certified infrastructure | | **Data Encryption** | AES-256 at rest, TLS 1.3 in transit | | **Audit Logging** | Complete trail of all system actions | | **Data Isolation** | Complete data separation between organizations | ### Deployment Options | Method | Description | |--------|-------------| | **Script Tag** | Single JavaScript snippet added before the closing body tag | | **iFrame** | Embed the chatbot within a specific section of your page | | **Popup** | Launch the chatbot from a custom button or link | --- ## 1.1.3 How the Platform Works ### Architecture Overview ![Platform Architecture Diagram](/images/architecture-diagram.jpg) ### 
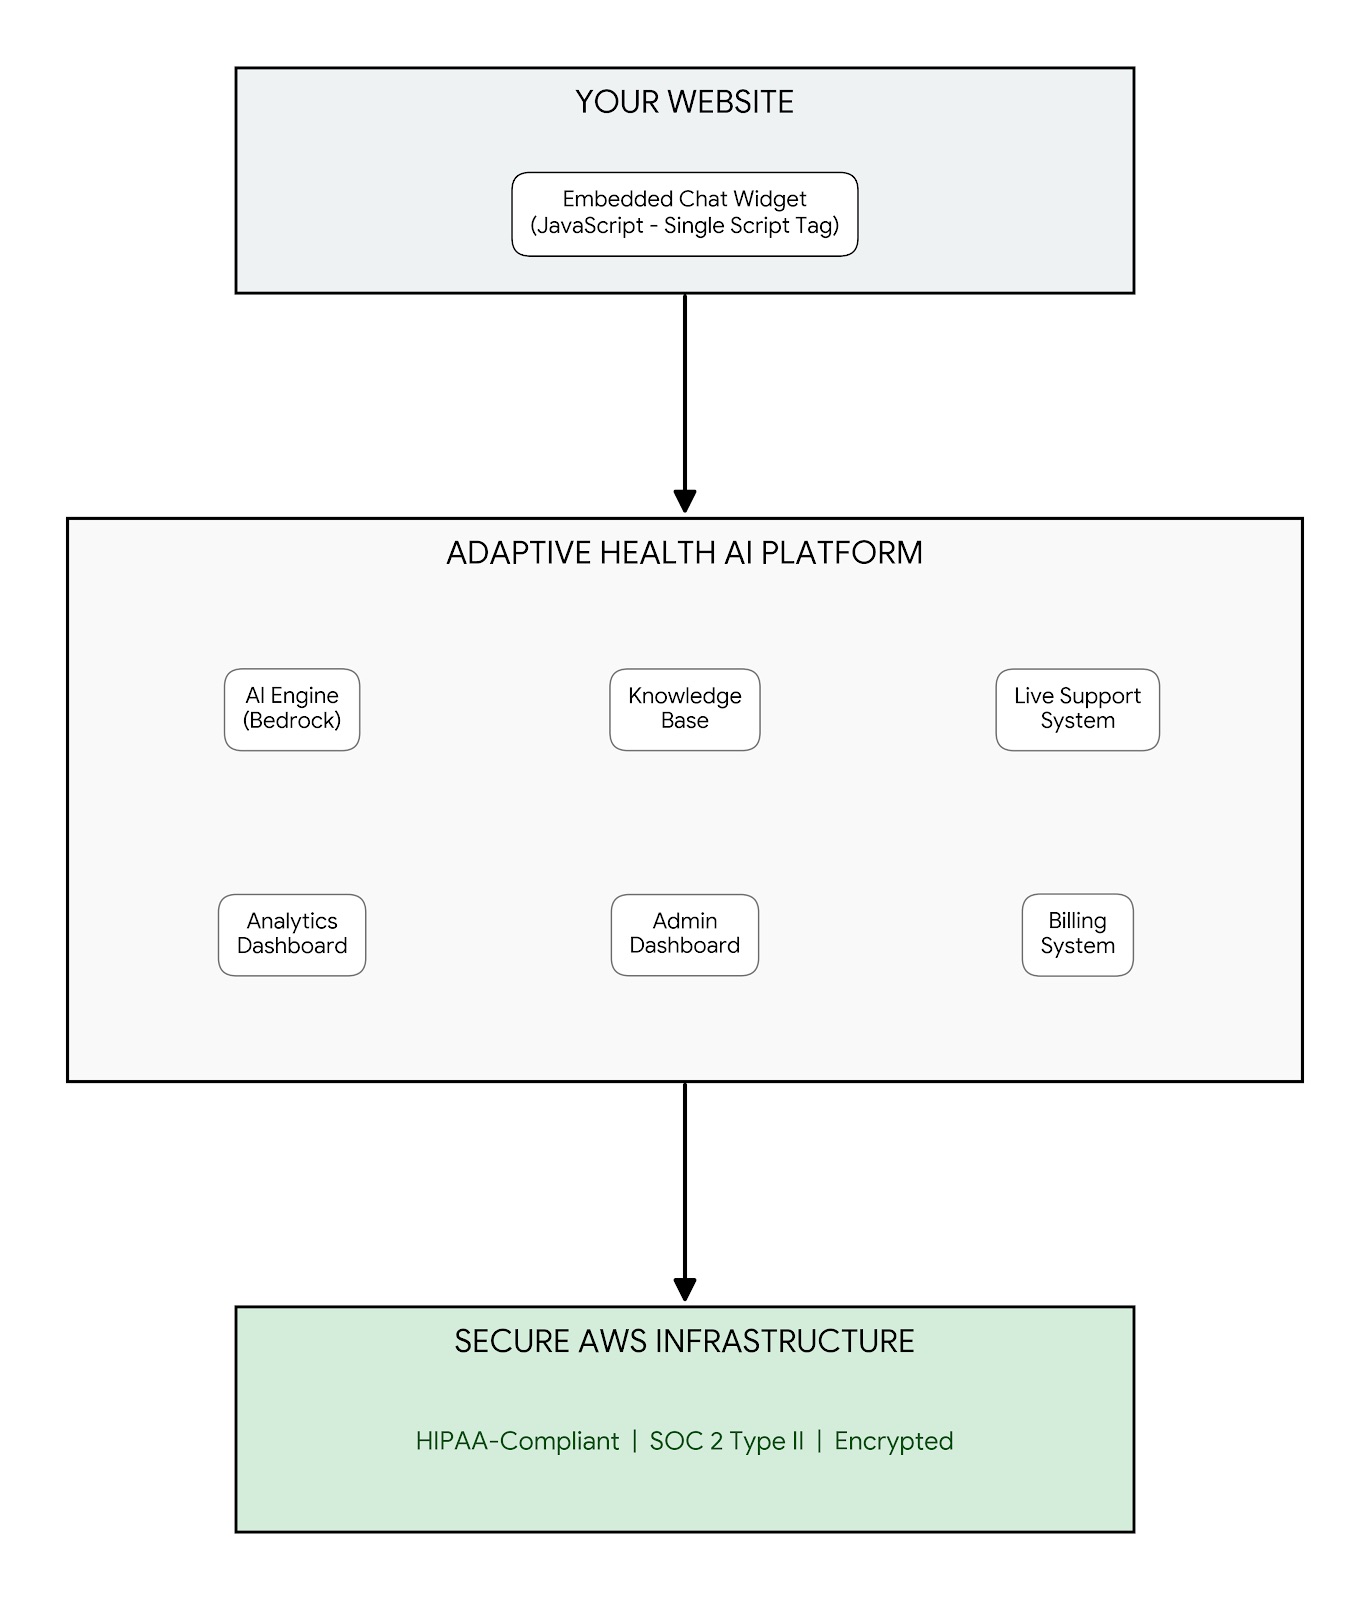
How a Conversation Works ![Conversation Flow Diagram](/images/conversation-flow-diagram.jpg) 
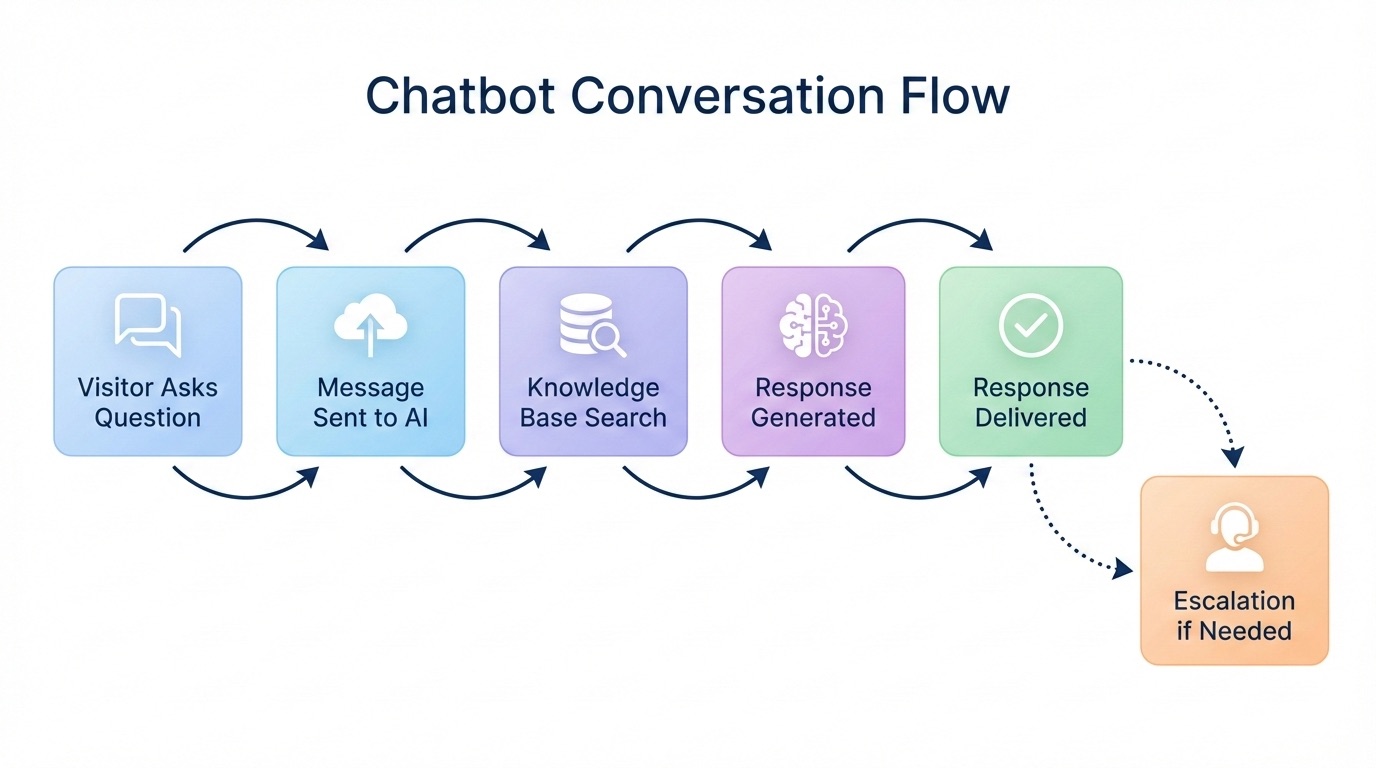
1. **Visitor asks a question** -- The chatbot widget captures the message 2. **Message sent to the platform** -- Securely transmitted to Adaptive Health AI 3. **Knowledge base search** -- The AI searches your trained content for relevant information 4. **Response generated** -- The AI creates a contextual, accurate response 5. **Response delivered** -- The visitor receives the answer in real time 6. **Escalation if needed** -- The visitor can request to speak with a live agent at any time ### The Training Process ![AI Training Process Diagram](/images/training-process-diagram.jpg) 
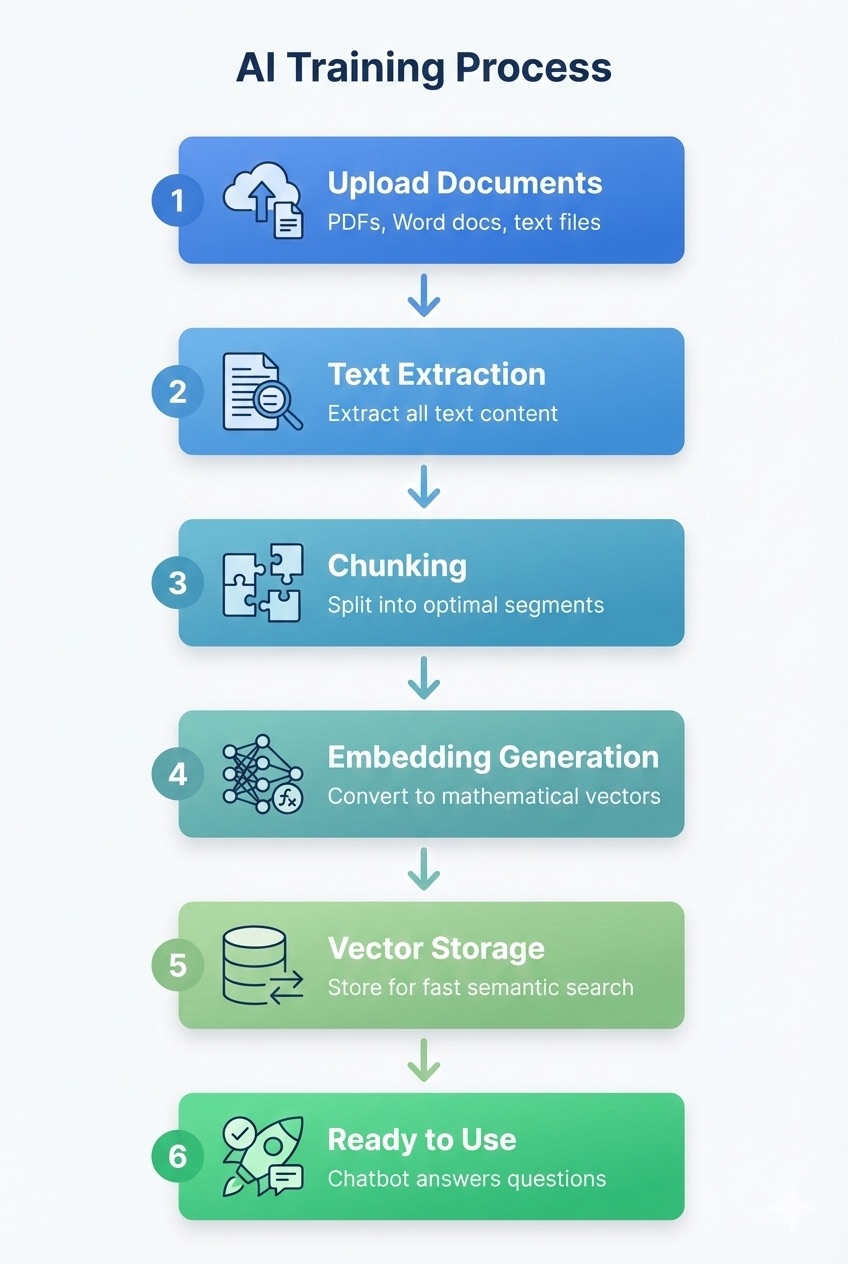
1. **Upload documents** -- PDFs, Word docs, text files, or Markdown files containing your information 2. **Or crawl your website** -- The platform pulls content directly from your existing web pages 3. **Content is processed** -- Your content is prepared for AI-powered search 4. **Ready to use** -- Your chatbot can now answer questions based on your content --- ## 1.1.4 Use Cases for Healthcare Organizations ### Use Case 1: Hospital Patient Services **Challenge**: Large hospital receives 500+ calls daily asking about visiting hours, parking, directions, and general policies. **Solution**: Deploy a chatbot trained on: - Visitor policies and hours - Department locations and directions - Parking information - Patient rights and responsibilities - Billing FAQ **Results**: - Reduced call volume for routine questions - 24/7 availability for common inquiries - Staff freed for complex patient needs ### Use Case 2: Private Practice Front Desk **Challenge**: Small practice with limited staff can't answer phones while checking in patients. **Solution**: Deploy a chatbot trained on: - Office hours and location - Services offered - New patient information - Insurance accepted - Appointment preparation **Results**: - Virtual front desk assistant - Lead capture when the office is busy - After-hours information availability ### Use Case 3: Telehealth Technical Support **Challenge**: Telehealth provider spends significant time helping patients connect to video visits. **Solution**: Deploy a chatbot trained on: - Technical requirements - Step-by-step connection instructions - Troubleshooting common issues - Browser compatibility - Mobile app instructions **Results**: - Reduced technical support calls - Higher appointment completion rates - Better patient experience ### Use Case 4: Mental Health Resource Center **Challenge**: Mental health practice needs to provide resources between sessions while maintaining appropriate boundaries. **Solution**: Deploy a chatbot trained on: - Coping strategies and techniques - Crisis resources and hotlines - Appointment scheduling information - General wellness information - Practice policies **Results**: - 24/7 resource availability - Appropriate escalation to live agents - Reduced after-hours calls ### Use Case 5: Specialty Surgical Center **Challenge**: Patients need detailed pre-operative and post-operative instructions that are often forgotten or lost. **Solution**: Deploy a chatbot trained on: - Pre-operative preparation checklists - Post-operative care instructions - Medication guidelines - What to expect during recovery - When to contact the office **Results**: - Fewer calls about routine post-op questions - Patients can access instructions anytime - Better patient outcomes --- ## Getting Started Ready to create your account? Continue to the next section: **[1.2 Account Setup](./1.2-account-setup.md)** --- ## Quick Links - [Creating Your First Chatbot](./1.3-first-chatbot.md) - [Training Your Chatbot](../part3-training/3.1-understanding-training.md) - [Customizing Your Widget](../part2-chatbot-config/2.2-widget-appearance.md) - [Setting Up Live Support](../part4-live-support/4.1-overview.md) --- # Module 1.2: Account Setup ## 1.2.1 Creating Your Account ### Visit the Registration Page Navigate to [adaptivehealthai.com/register](https://adaptivehealthai.com/register) to begin the registration process. Registration is completed in three steps. All required fields must be filled in before you can proceed to the next step. --- ### Step 1: Company Information Provide details about your organization. | Field | Requirements | |-------|-------------| | **Company Name** | Required | | **Company Website** | Required | | **Company Size** | Dropdown selection: 1-10, 11-50, 51-200, 201-500, 500+ | | **Industry** | Dropdown selection: Healthcare, Technology, Finance, Education, Retail, Other | --- ### Step 2: Your Information Provide your personal contact details. | Field | Requirements | |-------|-------------| | **Full Name** | Required | | **Email Address** | Required, must be a valid email | | **Phone Number** | Optional. Includes a country code selector | | **Time Zone** | Dropdown selection: Eastern, Central, Mountain, Pacific, UTC | ### Tips - Use your organization's email domain (not a personal email) for easier team management later - Select the time zone that matches where your team operates so that scheduling and notifications are accurate --- ### Step 3: Payment Information A 14-day free trial is included with your registration. Your card will be validated during this step, but you will not be charged during registration. Billing begins automatically after your 14-day trial ends. Visit our [pricing page](https://adaptivehealthai.com/pricing) for full details on available plans. | Field | Requirements | |-------|-------------| | **Cardholder Name** | Required | | **Card Details** | Entered through a secure CardPointe payment form. Visa and Mastercard only -- American Express and Discover are not supported | | **Expiration Month / Year** | Required | | **Billing Address** | Address, City, State, ZIP, Country | | **Terms of Service** | Required -- you must agree to proceed | | **Privacy Policy** | Required -- you must agree to proceed | | **Marketing Emails** | Optional -- opt in to receive product updates and tips | Click **"Complete Registration"** to submit your registration. > **Note**: There are no password fields during registration. You will set your password when you first log in through the onboarding wizard. --- ## 1.2.2 Email Verification ### Why Verification is Required Email verification ensures: - Your email address is valid and accessible - Only authorized users can create accounts - Important notifications reach you - Account recovery is possible ### Verification Process **Step 1: Check Your Inbox** After registration, check your email for a message from Adaptive Health AI with the subject line "Verify Your Email Address." **Step 2: Click the Verification Link** The email contains a verification button or link that says **"Verify Email"**. Click it to confirm your email address. **Step 3: Confirmation** You will be redirected to the platform with a confirmation that your email is verified. You can now log in for the first time. ### Troubleshooting Email Verification | Issue | Solution | |-------|----------| | **Email not received** | Check your spam or junk folder | | **Email in spam** | Mark as "not spam" and add our address to your contacts | | **Link expired** | Request a new verification email from the login page | | **Wrong email entered** | Contact support at support@adaptivetelehealth.com | ### Resending Verification Email If you need a new verification email: 1. Go to the login page 2. Enter your email address 3. If unverified, you will see an option to **"Resend Verification Email"** 4. Click the link and check your inbox --- ## 1.2.3 Legal Agreements ### Required Agreements During registration (Step 3), you must accept the following: #### Terms of Service The Terms of Service outline: - Acceptable use of the platform - Your responsibilities as a user - Our responsibilities as a provider - Intellectual property rights - Limitation of liability - Termination conditions #### Privacy Policy The Privacy Policy explains: - What data we collect - How we use your data - How we protect your data - Your data rights - Cookie usage - Third-party services For more details, see [Privacy & GDPR](../part9-security/9.3-privacy-gdpr.md). ### Viewing Agreements Later You can review the agreements at any time: - **Terms of Service**: [adaptivehealthai.com/terms](https://adaptivehealthai.com/terms) - **Privacy Policy**: [adaptivehealthai.com/privacy](https://adaptivehealthai.com/privacy) ### Agreement Updates When we update our legal documents: - You will be notified via email - You will see the updated terms on your next login - Continued use requires acceptance of new terms --- ## 1.2.4 Dashboard Orientation ### First Login After verifying your email, log in for the first time. You will be guided through an onboarding wizard that includes setting your password and selecting a plan. See [1.3 Creating Your First Chatbot](./1.3-first-chatbot.md) for details on the onboarding process. ### Dashboard Layout Once onboarding is complete, you land on the main dashboard. ``` +-------------------------------------------------------------+ | [Logo] ADAPTIVE HEALTH AI [User Menu] | +-------------+-----------------------------------------------+ | | | | Dashboard | WELCOME TO ADAPTIVE HEALTH AI | | Chatbots | | | Team | +---------+ +---------+ +---------+ | | Settings | |Chatbots | |Messages | |Documents| | | Billing | | 0 | | 0 | | 0 | | | Audit Logs | +---------+ +---------+ +---------+ | | | | | | RECENT ACTIVITY | | | No activity yet. Create your first chatbot! | | | | | | [+ Create Chatbot] | | | | +-------------+-----------------------------------------------+ ``` ### Navigation Menu | Menu Item | Description | |-----------|-------------| | **Dashboard** | Overview of your account activity and metrics | | **Chatbots** | List and manage your chatbots | | **Team** | Invite and manage team members | | **Settings** | Organization settings, time zone, domains | | **Billing** | Subscription, usage, and payment methods | | **Audit Logs** | View activity history | For more on organization settings, see [Organization Settings](../part6-team-account/6.3-organization-settings.md). ### User Menu Click your name in the top-right corner to access: | Option | Description | |--------|-------------| | **Profile** | Update your personal information | | **Account** | Password and notification settings | | **Support Chat** | Contact our support team | | **Logout** | Sign out of your account | --- ## 1.2.5 Troubleshooting Account Issues ### Login Problems | Issue | Solution | |-------|----------| | Forgot password | Use the "Forgot Password" link on the login page | | Account locked | Contact support at support@adaptivetelehealth.com after multiple failed attempts | | Session expired | Log in again | ### Account Access | Issue | Solution | |-------|----------| | Need to change email | Go to Profile and edit your email (verification required) | | Multiple organizations | Each organization needs a separate account | | Transfer ownership | Contact support at support@adaptivetelehealth.com | ### Billing Issues | Issue | Solution | |-------|----------| | Payment failed | Update your payment method in Billing settings | | Wrong plan | Upgrade or downgrade in Billing settings | | Need invoice | Download from Billing in Payment History | --- ## Next Steps Now that your account is set up, you are ready to create your first chatbot: **[1.3 Creating Your First Chatbot](./1.3-first-chatbot.md)** --- ## Quick Links - [Creating Your First Chatbot](./1.3-first-chatbot.md) - [Organization Settings](../part6-team-account/6.3-organization-settings.md) - [Billing & Subscription](../part7-billing/7.1-subscription-plans.md) - [Privacy & GDPR](../part9-security/9.3-privacy-gdpr.md) --- # Module 1.3: Creating Your First Chatbot This guide walks you through the onboarding experience, creating your first chatbot, configuring it, testing it, and deploying it to your website. --- ## 1.3.1 First Login and Onboarding When you log in for the first time after verifying your email, you will be guided through an onboarding wizard. The wizard includes the following steps: ### Step 1: Set Your Password If a password change is required, you will be prompted to create a secure password for your account. Choose a password you have not used elsewhere and store it in a secure password manager. ### Step 2: Select a Plan Choose the subscription plan that fits your organization's needs. Visit our [pricing page](https://adaptivehealthai.com/pricing) for details on what each plan includes. All paid plans include a 14-day free trial. ### Step 3: Product Tour and Setup Wizard A guided tour walks you through the key areas of the platform and helps you set up your first chatbot. Follow the prompts to get familiar with the dashboard, navigation, and core features. --- ## 1.3.2 Creating a New Chatbot ### Navigate to Chatbots From the dashboard, click **"Chatbots"** in the left navigation menu, or click the **"+ Create Chatbot"** button on the dashboard. ### Click Create New On the Chatbots page, click the **"+ New Chatbot"** button in the top-right corner. ### Enter Basic Information Fill out the chatbot creation form: | Field | Description | Example | |-------|-------------|---------| | **Name** | A descriptive name for your chatbot | "Patient Services Bot" | | **Description** | Brief description of the bot's purpose | "Answers questions about our clinic services, hours, and policies" | ### Create the Chatbot Click **"Create Chatbot"** to create your new chatbot. You will be redirected to the chatbot management page. ### Naming Tips - Use clear, descriptive names - Include the purpose or department - Examples: - "Main Website Assistant" - "Billing FAQ Bot" - "New Patient Information" - "Telehealth Support" --- ## 1.3.3 Understanding the Chatbot Management Page After creating your chatbot, you land on the chatbot management page. This page is organized into tabs that give you access to all chatbot features. ### Chatbot Tabs | Tab | Purpose | |-----|---------| | **Analytics** | View conversation counts, message volume, visitor stats, and response times | | **Leads** | View and manage contact information captured from visitors | | **Settings** | Configure chatbot behavior, appearance, and advanced features | | **Training** | Upload documents and crawl websites to train your chatbot | | **Sandbox** | Test your chatbot in a live preview before deploying | | **Conversations** | View and review past chat conversations | | **Deploy** | Get the embed code to add the chatbot to your website | --- ## 1.3.4 Configuring Your Chatbot The **Settings** tab is where you configure how your chatbot behaves and appears. It is divided into two sub-sections. ### Basic Information Configure the core behavior of your chatbot: - **Personality** -- Set the tone and character of your chatbot's responses - **Purpose** -- Define what your chatbot is designed to help with - **Response Style** -- Control how detailed or concise responses should be ### Advanced Settings Configure additional features and appearance options: - **Widget Appearance** -- Customize colors, logo, position, and theme to match your brand - **AI Model Settings** -- Adjust how the AI generates responses - **Lead Capture Form** -- Configure the form that collects visitor contact information - **Email Notifications** -- Set up conversation summaries, lead alerts, and daily digests - **Conditional Buttons** -- Add smart action buttons that appear based on conversation context - **Support Hours** -- Define when your team is available for live support > **Tip**: For your first chatbot, start with the Basic Information settings and a welcome message. You can explore the advanced options once your chatbot is live. --- ## 1.3.5 Uploading Your First Training Content The most important step is training your chatbot with your content. Go to the **Training** tab to get started. ### Preparing Your Content **Best content to start with:** - FAQ documents - Patient information guides - Office policies - Service descriptions - Contact and hours information **Supported file formats:** - PDF (.pdf) - Microsoft Word (.docx) - Plain Text (.txt) - Markdown (.md) **Tips for good training content:** - Clear, well-organized content works best - Include questions and answers when possible - Keep content current and accurate - Maximum file size: 10MB ### Uploading a Document 1. Click the **"Training"** tab in your chatbot management page 2. Click the **"Upload Document"** button 3. Select a file from your computer 4. Wait for processing to complete -- you will see the status change to "Ready" 5. Once ready, your chatbot can answer questions based on that content For detailed guidance on document management, see [Document Upload](../part3-training/3.2-document-management.md). ### Training from Your Website If you already have a website with the information your chatbot needs: 1. Go to the **Training** tab 2. Click **"Crawl Website"** 3. Enter your website URL 4. Click **"Start Crawling"** 5. The platform extracts and processes your web content automatically --- ## 1.3.6 Testing in the Sandbox Before deploying to your website, test your chatbot using the **Sandbox** tab. ### Accessing the Sandbox 1. Click the **"Sandbox"** tab in your chatbot management page 2. A chat interface appears that is identical to what your visitors will see ### What to Test **Welcome Message**: Verify your greeting appears correctly and suggested questions are displayed. **Basic Questions**: Ask questions that are covered in your training content: - "What are your hours?" - "Where are you located?" - "How do I make an appointment?" **Edge Cases**: Test questions that may not be covered: - "What's the weather today?" - "Can you diagnose my symptoms?" **Conversation Flow**: Have a multi-turn conversation to make sure follow-up questions work naturally. ### Improving Responses | Response Quality | Action | |-----------------|--------| | **Accurate and helpful** | Your training content is working well | | **Partially correct** | Add more training content on that topic | | **Incorrect** | Review your training documents and correct the information | | **"I don't know"** | Upload content that covers the topic | | **Off-topic** | Adjust the chatbot's personality and purpose in Settings | If specific questions need exact answers, use Q&A Overrides to set a predetermined response for those questions. --- ## 1.3.7 Deploying to Your Website Once testing is complete, go to the **Deploy** tab to get your embed code. ### Getting Your Embed Code 1. Click the **"Deploy"** tab in your chatbot management page 2. You will see a script tag like this: ```html ``` 3. Click **"Copy Code"** to copy it to your clipboard ### Adding to Your Website Paste the script tag just before the closing `` tag on your website: ```html Your Website ``` #### WordPress 1. Install a plugin like "Insert Headers and Footers" 2. Add the script tag to the footer section 3. Save and publish #### Website Builders (Wix, Squarespace, etc.) 1. Find the "Custom Code" or "Embed" option in your site settings 2. Add the script tag to the footer or body section 3. Publish your changes ### Verifying Deployment After adding the code to your site: 1. Visit your website 2. Look for the chat icon (usually in the bottom-right corner) 3. Click the icon to open the chat 4. Send a test message 5. Verify that responses are working correctly ### Deployment Checklist - Embed code is added to all pages (or via your site template) - Chat icon appears correctly - Widget opens when clicked - Messages send successfully - Responses are received - Suggested questions appear - Colors match your brand - Mobile view works correctly --- ## Quick Start Summary 1. **Create a chatbot** -- Give it a name and description 2. **Upload one document** -- Your FAQ or main information page 3. **Set your welcome message** -- A friendly greeting for visitors 4. **Test in the Sandbox** -- Verify responses are accurate 5. **Deploy** -- Add the script tag to your website --- ## What's Next? Now that your chatbot is live, explore these topics to enhance it: - **[Document Upload](../part3-training/3.2-document-management.md)** -- Add more training content - **[Widget Customization](../part2-chatbot-config/2.2-widget-appearance.md)** -- Fine-tune appearance and behavior - **[Live Agent Support](../part4-live-support/4.1-overview.md)** -- Let your team chat with visitors - **[Analytics](../part5-analytics/5.1-dashboard-overview.md)** -- Track performance and usage --- ## Troubleshooting First Deployment ### Widget Not Appearing | Issue | Solution | |-------|----------| | Script not loading | Verify the embed code is correctly placed before the closing body tag | | Wrong bot ID | Copy the code again from the Deploy tab | | Browser caching | Clear your browser cache and refresh the page | | JavaScript blocked | Check for browser extensions or script blockers | | HTTPS required | Your site must use HTTPS for the widget to load | ### Chatbot Not Responding | Issue | Solution | |-------|----------| | No training content | Upload at least one document in the Training tab | | Document still processing | Wait for the status to show "Ready" | | Connection issue | Check your internet connection | | Chatbot inactive | Make sure the chatbot is set to active in Settings | ### Poor Response Quality | Issue | Solution | |-------|----------| | Irrelevant answers | Add more relevant training content | | "I don't know" responses | Upload content that covers those topics | | Too generic | Create a specific FAQ document with direct questions and answers | | Outdated information | Update or replace old training documents | --- ## Quick Links - [Widget Customization](../part2-chatbot-config/2.2-widget-appearance.md) - [Document Upload](../part3-training/3.2-document-management.md) - [Web Crawler](../part3-training/3.3-website-crawler.md) - [Live Agent Support](../part4-live-support/4.1-overview.md) --- # Chatbot Management Once you create a chatbot, you manage it from a dedicated management page. This guide covers the layout and key areas you will use. --- ## Chatbot Header At the top of the management page, you will see: - **Chatbot Name** and **Description** -- the name and summary you gave your chatbot when you created it - **Bot ID** -- a unique identifier for your chatbot, used in the embed code - **Active / Inactive Toggle** -- a switch to turn your chatbot on or off instantly When your chatbot is **Active**, it loads on your website and responds to visitors. When it is **Inactive**, the widget does not appear and visitors cannot start conversations. All your settings, training data, and conversation history are preserved regardless of status. --- ## Management Tabs The management page is organized into tabs. Each tab is permission-controlled, so team members only see the tabs they have access to. ### Analytics View conversation statistics, message volumes, response times, visitor data, topic breakdowns, and charts. Use this tab to understand how visitors interact with your chatbot and identify trends over time. ### Leads View and manage captured visitor information. Filter leads by status or date range, review individual submissions, and export your leads for follow-up in your CRM or other tools. ### Settings Configure your chatbot's AI behavior, widget appearance, lead capture forms, email notifications, conditional buttons, and support hours. This is where you control how your chatbot looks, acts, and communicates. ### Training Upload documents, crawl websites, and manage Q&A Overrides to train your chatbot. Everything your chatbot knows comes from the content you provide in this tab. ### Sandbox Test your chatbot in a live preview environment before deploying it to your website. Use the Sandbox to verify that responses, appearance, and behavior are working as expected. ### Conversations Browse your chatbot's full conversation history. Review individual messages, see how the AI responded, create Q&A Overrides directly from any response, and export transcripts. ### Deploy Get the embed code to add your chatbot to your website. Choose from multiple deployment methods and copy your personalized installation code. --- ## Creating Additional Chatbots You can create multiple chatbots for different purposes, such as: - Different departments (Billing, Scheduling, General Inquiries) - Different locations (Main Office, Branch Office) - Different websites or landing pages - Different audiences (Customers, Partners, Job Applicants) To create a new chatbot, click **"+ New Chatbot"** on the Chatbots page, enter a name and description, and click **"Create Chatbot"**. --- ## Deleting a Chatbot Deleting a chatbot is permanent and cannot be undone. It removes the chatbot and all associated settings, training documents, conversation history, analytics data, and captured leads. Before deleting, consider: - **Exporting conversations** from the Conversations tab - **Downloading documents** from the Training tab - **Deactivating** the chatbot instead if you may need it later To delete, click the delete icon on the Chatbots list page and confirm by typing the chatbot name. --- ## Best Practices - Use clear, descriptive names for your chatbots so your team can identify them quickly - Review conversation quality and analytics on a regular basis - Test changes in the Sandbox before deploying - Keep training documents up to date as your business information changes - Check Q&A Overrides periodically to make sure they are still accurate --- ## Quick Links - [Widget Appearance](./2.2-widget-appearance.md) - [Training Documents](../part3-training/3.2-document-management.md) - [Deployment](./2.10-deployment.md) - [Analytics](../part5-analytics/5.1-dashboard-overview.md) --- # Widget Appearance Customize the look and feel of your chatbot widget to match your brand. These settings are found in **Settings > Advanced > Widget Appearance**. --- ## Position Choose where the chat widget appears on your website: | Option | Description | |--------|-------------| | **Bottom Right** | The most common placement (industry standard) | | **Bottom Left** | Good for sites with other elements in the bottom right | | **Top Right** | Upper right corner of the page | | **Top Left** | Upper left corner of the page | --- ## Theme Select a visual theme for the widget: - **Light** -- White and light gray backgrounds with dark text. Clean and professional. - **Dark** -- Dark backgrounds with light text. Modern appearance and easier on the eyes in low-light settings. --- ## Button Appearance Customize the floating chat button that visitors click to open the widget: - **Button Color** -- Use the color picker to set the button's background color. Choose a color that stands out on your website while matching your brand. - **Button Logo** -- Upload a custom image for the button. An image cropper lets you adjust the image after uploading. - **Icon Selection** -- Choose from a set of built-in icons if you prefer not to upload a custom image. --- ## Header Appearance Customize the header bar that appears at the top of the open chat window: - **Header Color** -- Use the color picker to set the header's background color. - **Header Logo** -- Upload a custom logo for the header. An image cropper lets you adjust it after uploading. - **Icon Selection** -- Choose a built-in icon for the header if you prefer not to upload a logo. --- ## Welcome Popup The welcome popup is a small message that appears near the chat button before a visitor opens the widget, encouraging them to start a conversation. - **Toggle** -- Turn the welcome popup on or off - **Popup Message** -- Customize the text that appears in the popup --- ## Font Settings Control the typography inside the chat widget: - **Font Family** -- Select from available fonts to match your website's typography - **Font Size** -- Choose from Small, Medium, Large, or X-Large to control text size in the widget Larger font sizes improve readability and accessibility, especially for audiences who may benefit from bigger text. --- ## Suggested Questions Configure floating bubble questions that appear when a visitor opens the widget. These disappear after the visitor sends their first message. For detailed instructions, see [Suggested Questions](./2.4-suggested-questions.md). --- ## Preview and Testing The Settings page includes a live preview that updates in real time as you make changes. After saving, visit your website to verify the appearance, and test on both desktop and mobile devices. --- ## Quick Links - [Content Customization](./2.3-widget-content.md) - [Suggested Questions](./2.4-suggested-questions.md) - [Behavior Settings](./2.5-widget-behavior.md) - [Deployment](./2.10-deployment.md) --- # Widget Content Configure the text content that visitors see when interacting with your chatbot. These settings are found in the **Settings** tab. --- ## Greeting Message The greeting message is the first message your chatbot displays when a visitor opens the widget. It sets the tone for the conversation and helps visitors understand what the chatbot can help with. ### Tips for a Good Greeting - Keep it to 2-4 sentences - Introduce the chatbot and mention what it can help with - End with a prompt or question to encourage the visitor to respond - Match your organization's voice and tone ### Examples **Customer Support:** > Hi there! I'm the virtual assistant for Acme Corp. I can help with product questions, order status, and account information. How can I help you today? **Professional Services:** > Welcome to Smith & Associates. I can answer questions about our services, availability, and pricing. What would you like to know? **General Business:** > Hello! I'm here to help you find what you need. Ask me about our services, hours, or location. What can I help you with? --- ## Message Placeholder The message placeholder is the hint text that appears in the message input field before a visitor starts typing. It guides visitors on how to interact with the chatbot. Good placeholder text is short and actionable: - "Type your question here..." - "Ask me anything..." - "How can I help you today?" Keep it under 50 characters so it displays well on all screen sizes. --- ## Welcome Popup The welcome popup is the small message that appears next to the chat button before a visitor opens the widget. It draws attention and encourages visitors to start a conversation. - **Toggle** -- Turn the popup on or off - **Popup Message** -- Set the text that appears in the popup The welcome popup is separate from the greeting message. The popup appears while the widget is closed; the greeting message appears after the visitor opens the widget. For more on how AI behavior and response quality work, see [AI Behavior & Guardrails](./2.8-ai-behavior.md). --- ## Quick Links - [Suggested Questions](./2.4-suggested-questions.md) - [Behavior Settings](./2.5-widget-behavior.md) - [Widget Appearance](./2.2-widget-appearance.md) - [Deployment](./2.10-deployment.md) --- # Suggested Questions Suggested questions are pre-written prompts that appear as floating bubbles when a visitor opens the chat widget. They help visitors start a conversation quickly without needing to type a question from scratch. --- ## How Suggested Questions Work When a visitor opens the widget, the suggested questions appear as animated floating bubbles above the message input area. Visitors can click any bubble to send that question instantly. The bubbles disappear after the visitor sends their first message -- whether they click a bubble or type their own question. Until then, the bubbles remain visible each time the widget is opened. --- ## Configuring Suggested Questions Suggested questions are managed in **Settings > Advanced > Widget Appearance**. ### Adding a Question 1. Find the **Suggested Questions** section 2. Click the button to add a new question 3. Type the question text 4. Repeat for additional questions 5. Save your changes ### Editing or Removing Questions - Click on an existing question to edit its text - Use the delete button to remove a question - Drag to reorder questions if needed ### How Many to Add Three to five suggested questions is ideal. Too few limits their usefulness, and too many can feel cluttered. Aim for a mix of topics that reflect the most common reasons visitors come to your site. --- ## Writing Good Suggested Questions The best suggested questions are: - **Short** -- Keep them under 50 characters so they fit comfortably in the bubbles - **Natural** -- Phrase them the way a real person would ask (e.g., "What are your hours?" rather than "Hours of operation") - **Varied** -- Cover different topics so different types of visitors find something relevant - **Answerable** -- Only suggest questions your chatbot is trained to answer well ### Examples - "What services do you offer?" - "How do I schedule an appointment?" - "What are your hours?" - "Where are you located?" - "Do you offer free consultations?" --- ## Testing and Improving After adding suggested questions, test them in the [Sandbox](./2.1-chatbot-management.md) to make sure your chatbot gives good answers for each one. Check your analytics periodically to see which questions visitors click most often, and update your suggestions based on what you learn. --- ## Quick Links - [Widget Behavior](./2.5-widget-behavior.md) - [Widget Content](./2.3-widget-content.md) - [Training Documents](../part3-training/3.2-document-management.md) - [Analytics](../part5-analytics/5.1-dashboard-overview.md) --- # Widget Behavior Configure how your chatbot widget behaves when visitors interact with it. These settings control automatic actions and interaction options. --- ## Auto-Open Delay The auto-open delay setting controls whether the chat widget opens automatically after a visitor arrives on your page, and how long to wait before doing so. - **Disabled** -- The widget only opens when a visitor clicks the chat button (default) - **Delay in seconds** -- Set a number of seconds to wait before the widget opens automatically ### When to Use Auto-Open Auto-open works well on support pages, help centers, or landing pages where you want to proactively engage visitors. For most general website pages, letting visitors open the widget themselves is less intrusive. ### Recommended Delays | Page Type | Suggested Delay | |-----------|-----------------| | Support / Help pages | 3-5 seconds | | Marketing / Landing pages | 5-10 seconds | | General content pages | Disabled | A delay that is too short can feel intrusive because the visitor has not yet oriented to the page. A delay that is too long risks the visitor leaving before the widget appears. --- ## Sound Notifications Toggle sound notifications on or off. When enabled, a subtle sound plays when the chatbot sends a new message, letting visitors know a response has arrived even if they are looking at another part of the page. Sound notifications are disabled by default. --- ## File Upload Toggle the file upload feature on or off. When enabled, visitors can attach files (such as images or documents) during a conversation. Enable file uploads when your workflow benefits from visitors sharing documents, screenshots, or other files. Disable it when file sharing is not relevant to your use case. --- ## Quick Links - [Business Information](./2.6-business-information.md) - [Contact Forms](./2.7-contact-forms.md) - [AI Behavior](./2.8-ai-behavior.md) - [Deployment](./2.10-deployment.md) --- # Business Information Provide your organization's key details so your chatbot can reference them in conversations. These settings are found in **Settings > Advanced**. --- ## Business Details ### Business Name Enter your organization's name. The chatbot uses this when referring to your business in responses. ### Business Phone Enter your main contact phone number. When visitors ask how to reach you by phone, the chatbot can provide this number in its responses. ### Business Address Enter your physical address. The chatbot uses this when visitors ask about your location or need directions. ### Calendar Link / Booking URL Enter the URL to your online scheduling or appointment booking system. When visitors ask about scheduling, the chatbot can direct them to this link. --- ## Support Hours Scheduling Support hours let you control when your chatbot is considered "online" and how it behaves outside of those hours. ### Master Toggle Turn Support Hours Scheduling on or off. When disabled, your chatbot operates the same way at all times. When enabled, the chatbot follows the schedule you configure below. ### Timezone Select the timezone your business operates in. The schedule you set is based on this timezone, and the chatbot adjusts its behavior accordingly for visitors in different locations. ### Weekly Schedule Set your available hours for each day of the week (Monday through Sunday). For each day, you can: - Toggle the day on or off (open or closed) - Set a start time and end time For example, you might set Monday through Friday from 9:00 AM to 5:00 PM, Saturday from 10:00 AM to 2:00 PM, and Sunday as closed. ### Offline Message Enter the message visitors see when they contact your chatbot outside of your scheduled hours. For example: "We are currently offline. Our support hours are Monday-Friday, 9 AM - 5 PM EST." ### Offline Behavior Choose what happens when visitors reach your chatbot outside of support hours: - **Allow offline message form** -- Visitors can fill out a contact form to leave a message for your team - **Show message only** -- Display the offline message without a form - **Hide chat** -- The chat widget does not appear at all outside of support hours ### "All Agents Offline" Message Set a custom message that appears when all your team members are offline. This message is shown when live support is expected but no one is currently available. --- ## How Business Information Appears in Conversations When you fill in your business details, the chatbot can naturally incorporate them into responses. For example: **Visitor:** "What are your hours?" **Chatbot:** "We are open Monday through Friday from 9:00 AM to 5:00 PM and Saturday from 10:00 AM to 2:00 PM. We are closed on Sundays." **Visitor:** "How do I book an appointment?" **Chatbot:** "You can schedule an appointment through our online booking page. Would you like the link?" For the best results, also include your business details in your training documents so the chatbot has multiple sources of accurate information. --- ## Quick Links - [Contact Forms](./2.7-contact-forms.md) - [AI Behavior](./2.8-ai-behavior.md) - [Deployment](./2.10-deployment.md) --- # Lead Capture Form Collect contact information from visitors through a form displayed inside the chat widget. These settings are found in **Settings > Advanced > Lead Capture Form**. --- ## Enabling the Form Use the master toggle to turn the lead capture form on or off. When enabled, visitors will see the form at the position you choose (see Form Position below). When disabled, the form does not appear. --- ## Customizing Form Text ### Form Title Set the heading that appears at the top of the form. For example: "Get in Touch" or "Contact Us." ### Form Description Add a short description below the title to explain why visitors should fill out the form. For example: "Leave your details and we will get back to you shortly." ### Success Message Customize the confirmation message visitors see after they submit the form. For example: "Thank you! We will be in touch soon." ### Button Text Change the text on the submit button. The default is "Submit," but you can customize it to something like "Send" or "Get Started." ### Button Color Use the color picker to set the submit button's background color to match your brand. --- ## Configuring Form Fields The lead capture form includes the following fields. For each field, you can configure: - **Enabled** -- Toggle whether the field appears on the form - **Required** -- Toggle whether the field must be filled in before submitting - **Label** -- The text label shown above the field - **Placeholder** -- The hint text shown inside the empty field ### Available Fields | Field | Description | |-------|-------------| | **Name** | Visitor's name | | **Email** | Visitor's email address | | **Phone** | Visitor's phone number | | **Company** | Visitor's company or organization | | **State** | A dropdown selector for the visitor's state | Start with the essentials -- Name and Email as required fields -- and add optional fields based on what information you need for follow-up. --- ## Form Position Choose where the lead capture form appears within the chat widget: | Position | Description | |----------|-------------| | **Header** | The form appears at the top of the chat window | | **Bottom** | The form appears at the bottom of the chat window | | **Floating** | The form appears as a floating overlay inside the widget | --- ## Viewing and Exporting Leads Submitted leads appear in the **Leads** tab on your chatbot management page. From there you can: - Filter leads by status or date range - Review individual submissions - Export leads for use in your CRM or follow-up workflows --- ## Quick Links - [AI Behavior](./2.8-ai-behavior.md) - [Q&A Overrides](./2.9-response-overrides.md) - [Analytics](../part5-analytics/5.1-dashboard-overview.md) - [Deployment](./2.10-deployment.md) --- # AI Behavior & Guardrails Control how your chatbot communicates with visitors and what safety boundaries it follows. These settings shape your chatbot's personality, response style, and protective limits. --- ## Personality and Purpose These settings are found in the **Settings > Basic Information** tab. They define how your chatbot presents itself and interacts with visitors. ### Personality Choose the overall personality your chatbot uses in conversations: - **Professional** -- Polished and businesslike - **Friendly** -- Warm and approachable - **Casual** -- Relaxed and conversational - **Technical** -- Precise and detail-oriented - **Empathetic** -- Understanding and supportive ### Purpose Select the primary purpose of your chatbot. This helps the AI focus its responses on the right type of assistance: - **Customer Support** -- Answering questions and resolving issues - **Sales & Lead Generation** -- Engaging visitors and capturing interest - **Information & FAQs** -- Providing general information and answering common questions - **Appointments & Bookings** -- Helping visitors schedule and manage appointments - **Technical Assistance** -- Providing technical help and troubleshooting - **Education & Training** -- Sharing educational content and guidance ### Response Style Control how detailed the chatbot's answers are: - **Concise** -- Short, direct answers - **Balanced** -- A moderate level of detail - **Detailed** -- Thorough, in-depth responses ### Language Complexity Set the reading level of responses: - **Simple** -- Plain, everyday language - **Moderate** -- Standard professional language - **Technical** -- Industry-specific terminology ### Greeting Style Choose the tone for the chatbot's initial greeting: - **Friendly** -- Warm and welcoming - **Professional** -- Businesslike and courteous - **Enthusiastic** -- Energetic and upbeat - **Neutral** -- Straightforward and calm ### Error Handling When the chatbot cannot answer a question, choose how it responds: - **Apologetic** -- Expresses regret and offers alternatives - **Direct** -- States clearly that it cannot help with that topic - **Helpful** -- Redirects the visitor to other resources or next steps --- ## Safety Constraints Safety constraints are checkboxes that set hard boundaries on what your chatbot will and will not do. Enable the constraints that are important for your organization: - **Never ask for personal data** -- Prevents the chatbot from requesting sensitive information like social security numbers, credit card details, or medical record numbers - **Don't provide external links (unless in training data)** -- The chatbot will only share links that are included in your training content, avoiding unknown or unverified URLs - **Never make guarantees or promises** -- Prevents the chatbot from making commitments on behalf of your organization, such as promising specific outcomes or pricing - **Stay neutral on controversial topics** -- The chatbot will avoid taking sides on political, religious, or other sensitive subjects - **Follow HIPAA/GDPR compliance** -- Applies privacy-focused behavior, ensuring the chatbot does not collect, store, or disclose protected information ### Why Guardrails Matter ![How AI Guardrails Work](/images/ai-guardrails-diagram.jpg) Guardrails protect your organization and your visitors by keeping conversations safe and on-topic. They ensure the chatbot: - **Stays within its scope** -- Only answers questions related to your business and training content - **Avoids harmful or inaccurate advice** -- Does not provide medical diagnoses, legal opinions, or financial recommendations unless your organization is specifically trained for that - **Protects visitor privacy** -- Does not request or store sensitive personal information - **Handles emergencies appropriately** -- Directs urgent situations to the right resources (such as suggesting visitors call emergency services or your office directly) - **Maintains compliance** -- Follows the regulatory requirements relevant to your industry --- ## Quick Links - [Q&A Overrides](./2.9-response-overrides.md) - [Training Documents](../part3-training/3.1-understanding-training.md) - [Deployment](./2.10-deployment.md) --- # Q&A Overrides Q&A Overrides let you define exact answers for specific questions. When a visitor asks a matching question, your custom answer is used instead of the AI-generated response. --- ## Where to Find Q&A Overrides Q&A Overrides are managed in the **Training** tab under the **Q&A Overrides** sub-tab. You can also create overrides directly from the **Conversations** tab. When reviewing a past conversation, click the edit button on any AI response to save it as an override. This is a quick way to correct a response you noticed was not quite right. --- ## How Overrides Work 1. A visitor asks a question 2. The system checks if the question matches any of your Q&A Overrides 3. If a match is found, your exact custom answer is delivered 4. If no match is found, the AI generates a response as usual Overrides always take priority over AI-generated responses when a match is found. --- ## Adding an Override 1. Go to **Training > Q&A Overrides** 2. Click the button to add a new override 3. **Enter the question** -- Type the question or phrase that should trigger this override 4. **Enter the answer** -- Type the exact response you want delivered 5. Save your changes ### Example **Question:** "What is your return policy?" **Answer:** "We offer a 30-day return policy on all products. Items must be in original condition with proof of purchase. To start a return, contact us at support@adaptivetelehealth.com or call our office during business hours." --- ## Editing and Deleting Overrides From the Q&A Overrides list, you can: - **Edit** an override to update the question or answer - **Delete** an override to remove it permanently Keep your overrides up to date as your business information changes. Outdated overrides can deliver incorrect information to visitors. --- ## When to Use Overrides Q&A Overrides are most useful when: - **A specific answer must be word-perfect** -- Legal information, pricing, contact details, or compliance-related responses - **The AI consistently gets something wrong** -- Correct a recurring mistake by providing the right answer yourself - **You need exact phrasing** -- Marketing messages, brand-specific language, or carefully worded policies For general topics where the AI handles responses well, training documents are a better approach because they scale more easily. Use overrides for the cases where precision matters most. --- ## Quick Links - [Deployment](./2.10-deployment.md) - [Training Documents](../part3-training/3.1-understanding-training.md) - [AI Behavior Settings](./2.8-ai-behavior.md) - [Chatbot Management](./2.1-chatbot-management.md) --- # Deployment Add your chatbot to your website by copying the embed code from the **Deploy** tab. The Deploy tab offers three deployment methods plus advanced options. --- ## Deployment Methods ### Script Tag (Recommended) The simplest and most common method. A single script tag with your chatbot ID and API URL loads the widget on your page. **How to install:** 1. Go to the **Deploy** tab and select **Script Tag** 2. Copy the provided code snippet 3. Open your website's HTML 4. Paste the code just before the closing `` tag 5. Save the file and refresh your page The script loads asynchronously, so it will not slow down your website. Your chatbot widget will appear automatically based on your appearance and position settings. > **Note:** The embed code shown in the Deploy tab is personalized with your chatbot's unique ID and API URL. Always copy your code directly from the Deploy tab rather than typing it manually. ### iFrame Embed your chatbot as an iframe with configurable dimensions and fixed positioning. This method is useful when you want to isolate the chatbot from the rest of your page's styles and scripts. **How to install:** 1. Go to the **Deploy** tab and select **iFrame** 2. Copy the provided iframe code 3. Paste it into your website's HTML where you want the chatbot to appear 4. Adjust the width and height if needed ### Popup Open the chatbot in a separate popup window triggered by a button click. This method is useful when you want the chatbot to open in its own window rather than appear inline on the page. **How to install:** 1. Go to the **Deploy** tab and select **Popup** 2. Copy the provided code 3. Add it to your website where you want the trigger button to appear --- ## Advanced Configuration The Deploy tab also includes advanced options for more customized integrations: - **Direct Widget Integration** -- Use the JavaScript API to programmatically open, close, toggle, or destroy the widget - **Custom iFrame** -- Embed a responsive iframe with custom CSS styling - **Delayed Loading** -- Load the widget after a specified delay or user action --- ## Installation Steps Regardless of which method you choose, the general process is: 1. **Copy** your personalized code from the Deploy tab 2. **Open** your website's HTML file (or template/theme file) 3. **Paste** the code before the closing `` tag 4. **Save** the file 5. **Refresh** your website to verify the chatbot appears --- ## Supported Platforms Your chatbot works on any website that supports custom HTML and JavaScript, including: - **WordPress** -- Add via theme editor, a custom code plugin, or your theme's footer template - **Shopify** -- Add to your theme's layout file - **Squarespace** -- Use the Code Injection settings - **Wix** -- Use the Custom Code section - **Custom HTML sites** -- Paste directly into your HTML files --- ## Testing Your Deployment After installing the embed code: 1. Visit your website and verify the chat widget appears 2. Open the widget and send a test message 3. Confirm the chatbot responds correctly 4. Test on a mobile device to check the layout 5. Try different browsers to ensure compatibility If the widget does not appear, check that: - The chatbot is set to **Active** in the management page - The embed code is placed before the closing `` tag - There are no JavaScript errors in your browser's developer console For help with deployment issues, contact support@adaptivetelehealth.com with your chatbot's Bot ID and website URL. --- ## Quick Links - [Chatbot Management](./2.1-chatbot-management.md) - [Widget Appearance](./2.2-widget-appearance.md) - [Training Documents](../part3-training/3.1-understanding-training.md) - [Analytics](../part5-analytics/5.1-dashboard-overview.md) --- # Understanding Training Learn how training works to make your chatbot knowledgeable and helpful. --- ## What is Chatbot Training? Training teaches your chatbot about your organization, services, policies, and any information you want it to share with visitors. You provide your content, the AI reads and learns from it, and then uses that knowledge to answer visitor questions in a natural, conversational way. ### How Training Works 1. **You provide content** -- Upload documents, crawl your website pages, or define specific Q&A pairs 2. **The AI learns from your content** -- Your materials are processed and stored so the chatbot can reference them 3. **A visitor asks a question** -- When someone interacts with your chatbot, the system searches your content for relevant information 4. **The AI generates a response** -- Based on what it found in your content, the AI crafts a natural, conversational answer ![Training Process Diagram](/images/training-process-diagram.jpg) ### The Training Advantage | Without Training | With Training | |------------------|---------------| | Generic responses | Specific, accurate answers | | Cannot answer about your services | Knows your services in detail | | May provide incorrect information | Provides verified information | | Same response for everyone | Personalized to your organization | --- ## The Training Tab The **Training** tab is where you manage all of your chatbot's knowledge. It contains three sub-tabs, each offering a different way to provide content to your chatbot. ### Documents Upload files for your chatbot to learn from. Supported formats include PDF, DOCX, TXT, and MD. This is ideal for existing materials like policies, brochures, handouts, and guides. Learn more in [Document Management](../part3-training/3.2-document-management.md). ### Web Crawler Crawl your website pages so the chatbot can answer questions about your site content. Enter a URL, configure how many pages and how deep to crawl, and the system automatically extracts the text from your web pages. Learn more in [Website Crawler](../part3-training/3.3-website-crawler.md). ### Q&A Overrides Define exact answers to specific questions. When a visitor asks a question that matches one of your overrides, your predefined answer is used instead of an AI-generated response. This is perfect for critical information that must be exactly right. Learn more in [Q&A Overrides](../part3-training/3.4-qa-training.md). --- ## Types of Training Content ### Comparing Training Methods | Method | Best For | Effort Level | |--------|----------|--------------| | **Documents** | Existing materials like policies, brochures, and guides | Low -- upload your existing files | | **Web Crawler** | Website content such as service pages, FAQs, and about pages | Low -- enter a URL and crawl | | **Q&A Overrides** | Critical information that needs exact wording (hours, pricing, contact info) | Medium -- write each Q&A pair | | **All combined** | Comprehensive coverage across all your content | Medium | ### Which Method Should You Use? Most organizations get the best results by combining all three methods: - **Start with documents and web crawling** to give your chatbot a broad base of knowledge - **Add Q&A Overrides** for your most critical and frequently asked questions where you need exact answers - **Fill in gaps** over time as you review chatbot conversations and identify areas for improvement --- ## Training Quality Factors The quality of your chatbot's responses depends directly on the quality of the content you provide. ### Content Quality | Factor | Impact | |--------|--------| | **Accuracy** | Incorrect content leads to wrong answers | | **Completeness** | Missing information means unanswered questions | | **Clarity** | Unclear content produces unclear responses | | **Currency** | Outdated content gives outdated answers | ### Coverage | Factor | Impact | |--------|--------| | **Topic breadth** | More topics covered means more questions answered | | **Specificity** | Detailed content enables detailed answers | | **Consistency** | Contradictory content can confuse responses | ### Quality Checklist - [ ] Content is accurate and up to date - [ ] All major topics are covered - [ ] Information is clearly written - [ ] No duplicate or conflicting information - [ ] Critical questions have Q&A Overrides with exact answers --- ## Next Steps Once you understand how training works, dive into the specific training methods: - [Document Management](../part3-training/3.2-document-management.md) -- Upload files for your chatbot to learn from - [Website Crawler](../part3-training/3.3-website-crawler.md) -- Crawl your website content - [Q&A Overrides](../part3-training/3.4-qa-training.md) -- Define exact answers to specific questions - [Training Best Practices](../part3-training/3.5-training-best-practices.md) -- Tips for getting the best results --- # Document Management Upload, organize, and manage the documents that train your chatbot. --- ## Accessing Document Management 1. Go to your chatbot's management page 2. Click the **Training** tab 3. Select the **Documents** sub-tab --- ## Uploading Documents ### How to Upload The Documents sub-tab features a drag-and-drop upload area at the top of the page. You can either: - **Drag and drop** files directly from your computer into the upload area - **Click to browse** and select files from your computer Multiple files can be uploaded at once. ### Supported File Formats | Format | Extension | Best For | |--------|-----------|----------| | **PDF** | .pdf | Policies, brochures, forms, handouts | | **Word** | .docx | Guidelines, procedures, manuals | | **Text** | .txt | Simple content, lists, notes | | **Markdown** | .md | Structured documentation | ### File Size Limit The maximum file size is **10 MB per file**. --- ## Document List After uploading, your documents appear in a list. Each document displays the following information: | Column | Description | |--------|-------------| | **Document name** | The name of the uploaded file | | **File type** | The format of the file (PDF, DOCX, TXT, MD) | | **File size** | How large the file is | | **Status** | Current processing state (see below) | | **Upload date** | When the file was uploaded | | **Actions** | Download or delete the document | --- ## Document Processing ### Automatic Processing After you upload a document, it is automatically processed so your chatbot can learn from its content. You do not need to take any additional action -- just upload and wait for processing to complete. ### Processing Status Each document shows a status indicator so you know where it stands: | Status | Meaning | |--------|---------| | **Uploaded** | File received and queued for processing | | **Processing** | Content is being read and prepared | | **Trained** | Document fully processed -- your chatbot can now use this content | | **Ready** | Document is available and active | | **Completed** | Processing finished successfully | | **Failed** | Something went wrong during processing (retry or re-upload) | ### Training Progress A progress bar shows the overall training status across all your documents, so you can see at a glance how much of your content has been processed. ### Failed Documents If a document fails to process: 1. Check that the file is not corrupted or password-protected 2. Verify the file is in a supported format (PDF, DOCX, TXT, MD) 3. Make sure the file is under the 10 MB size limit 4. Try re-uploading the document If the problem persists, contact support at support@adaptivetelehealth.com. --- ## Managing Documents ### Downloading Documents Click the download action on any document to save a copy of the original uploaded file to your computer. ### Deleting Documents To remove a document from your chatbot's training: 1. Find the document in the list 2. Click the delete action 3. Confirm the deletion when prompted Once deleted, your chatbot will no longer use that document's content when answering questions. Deletion is permanent -- keep local copies of important files in case you need to re-upload them later. ### Refreshing the Document List Use the refresh option to update the document list and see the latest processing status for all your documents. ### Training History The training history lets you review past processing activity, so you can track when documents were uploaded and processed. --- ## Keeping Your Content Up to Date ### Updating Documents When your content changes, update your chatbot's training by: 1. Deleting the outdated document 2. Uploading the new version 3. Waiting for processing to complete ### Signs of Outdated Content Review your documents if any of the following have changed: - Business hours or location - Services offered - Contact information - Pricing or policies - Staff or team details ### Organization Tips - Use clear, descriptive file names so you can easily identify each document - Remove outdated documents promptly to avoid incorrect answers - Consolidate overlapping content into single documents when possible - Review your document list regularly to keep it current --- ## Next Steps - [Understanding Training](../part3-training/3.1-understanding-training.md) -- Learn how training works - [Website Crawler](../part3-training/3.3-website-crawler.md) -- Crawl your website content - [Q&A Overrides](../part3-training/3.4-qa-training.md) -- Define exact answers to specific questions - [Training Best Practices](../part3-training/3.5-training-best-practices.md) -- Tips for getting the best results --- # Q&A Overrides Define exact answers to specific questions for precise control over your chatbot's responses. --- ## Accessing Q&A Overrides 1. Go to your chatbot's management page 2. Click the **Training** tab 3. Select the **Q&A Overrides** sub-tab --- ## What are Q&A Overrides? Q&A Overrides let you define exact answers to specific questions. When a visitor asks a question that matches one of your overrides, your predefined answer is used instead of an AI-generated response. This gives you complete control over how your chatbot responds to particular questions. --- ## When to Use Q&A Overrides Q&A Overrides are ideal for situations where you need precise, consistent answers: - **Critical information that must be exactly right** -- Pricing, business hours, phone numbers, addresses - **Frequently asked questions** -- Common questions where you want a specific, consistent answer every time - **Questions where the AI may not have enough training data** -- Topics not well covered by your documents or website content - **Legal or compliance-related questions** -- Answers that require precise wording for regulatory reasons - **Correcting AI responses** -- When you notice the chatbot giving an answer you want to improve --- ## Adding a Q&A Override 1. Click the **"Add Override"** button 2. **Enter the question** -- Type the question as a visitor might ask it 3. **Enter the answer** -- Type the exact answer you want displayed when this question is asked 4. Click **Save** ### Example **Question:** ``` What are your office hours? ``` **Answer:** ``` We are open Monday through Friday from 8:00 AM to 5:00 PM, and Saturday from 9:00 AM to 12:00 PM. We are closed on Sundays and major holidays. ``` --- ## Managing Overrides ### Viewing Overrides All of your Q&A Overrides are displayed in a list, showing each question and its corresponding answer. ### Editing an Override To change an existing override: 1. Find the override in the list 2. Click the edit action 3. Modify the question or answer text 4. Save your changes ### Deleting an Override To remove an override you no longer need: 1. Find the override in the list 2. Click the delete action 3. Confirm the deletion Once deleted, the chatbot will go back to generating AI-based responses for that question. --- ## Creating Overrides from Conversations You can also create Q&A Overrides directly from the **Conversations** tab. This is useful when you review a chatbot conversation and spot a response you want to improve. 1. Go to the **Conversations** tab 2. Find a conversation where the AI gave a response you want to change 3. Click the **edit button** on the AI's response 4. Modify the response text to what you want the answer to be 5. **Save** -- this automatically creates a Q&A Override The next time a visitor asks a similar question, your corrected answer will be used. --- ## Q&A Overrides vs. Document Training Both Q&A Overrides and document training help your chatbot answer questions, but they serve different purposes: ### Use Q&A Overrides When: - The answer must be exact and consistent every time - The information is critical (pricing, hours, contact details, policies) - You want to correct or improve a specific AI response - The question is a common FAQ with a specific answer ### Use Document Training When: - The topic is broad and can be phrased many different ways - You have detailed content that covers the subject thoroughly - You want the AI to synthesize information from multiple sources - The answer may vary depending on how the question is asked ### Using Both Together For the best results, use document training to give your chatbot broad knowledge, and add Q&A Overrides for your most important questions. This way, your chatbot has a strong foundation of knowledge while also delivering precise answers where it matters most. --- ## Tips for Writing Good Q&A Overrides - **Write questions the way your visitors would ask them** -- Use natural, everyday language - **Keep answers clear and concise** -- Provide the essential information without overwhelming the reader - **Include helpful details** -- Phone numbers, links, next steps, or anything that helps the visitor take action - **Review and update regularly** -- Make sure your overrides reflect current information ### Example: Good Override **Question:** What insurance do you accept? **Answer:** We accept most major insurance plans including Blue Cross, Aetna, UnitedHealthcare, Cigna, and Medicare. We also offer self-pay options. Contact our billing department at (555) 123-4567 to verify your specific coverage. ### Example: Override That Needs Improvement **Question:** Insurance? **Answer:** Yes. This is too vague to be helpful. A visitor asking about insurance likely wants to know which plans you accept and how to verify their coverage. --- ## Next Steps - [Understanding Training](../part3-training/3.1-understanding-training.md) -- Learn how training works - [Document Management](../part3-training/3.2-document-management.md) -- Upload documents for training - [Website Crawler](../part3-training/3.3-website-crawler.md) -- Crawl your website content - [Training Best Practices](../part3-training/3.5-training-best-practices.md) -- Tips for getting the best results --- # Website Crawler Train your chatbot using content from your existing website pages. --- ## Accessing the Web Crawler 1. Go to your chatbot's management page 2. Click the **Training** tab 3. Select the **Web Crawler** sub-tab --- ## Step 1: Enter Your Website URL Type the starting URL for the crawler in the URL field. This is the page where the crawler will begin, and it will follow links from there based on your settings. For example: `https://www.yourwebsite.com` or `https://www.yourwebsite.com/services` --- ## Step 2: Configure Crawler Settings Adjust the following settings to control how the crawler works: ### Max Pages A slider control that sets how many pages the crawler will visit. - **Range**: 1 to 1,000 pages - **Default**: 50 pages - Set this based on how much of your website you want the chatbot to learn from ### Max Depth A slider control that sets how many links deep the crawler will follow from your starting URL. - **Range**: 1 to 10 levels - **Default**: 3 levels - A depth of 1 means only pages directly linked from your starting URL; higher depth means the crawler follows links on those pages too ### Skip Patterns A comma-separated list of URL patterns the crawler should ignore. Use this to avoid crawling pages that are not useful for your chatbot. For example: `/admin, /login, /cart, /checkout` Any URL containing one of these patterns will be skipped during the crawl. --- ## Step 3: Authentication (Optional) If your website requires a login to access some or all of its content, you can provide authentication credentials so the crawler can reach those pages. ### Cookie Authentication Provide your browser cookies as JSON so the crawler can use your existing session to access authenticated pages. ### Form Login Enter the details needed for the crawler to log in through your website's login form: - **Login URL** -- The address of your login page - **Username** -- Your login username - **Password** -- Your login password - **Form field names** -- The names of the username and password fields on your login form ### Basic HTTP Authentication If your website uses HTTP Basic Authentication, provide a username and password. ### Custom Headers Add custom HTTP headers as JSON for any additional authentication requirements your website may have. --- ## Step 4: Crawl Scope Choose which pages the crawler should access when authentication is configured: | Option | Description | |--------|-------------| | **Pre-login only** | Crawl only publicly accessible pages | | **Post-login only** | Crawl only pages behind authentication | | **Both** | Crawl public pages first, then authenticated pages | --- ## Step 5: Start Crawling 1. Click **"Start Crawl"** to begin 2. A progress indicator shows the crawling status as pages are visited 3. Once complete, you can review the results --- ## Managing Crawled Content ### Viewing Crawled URLs After the crawl finishes, you will see a list of all crawled URLs with their status. You can: - **Search** the list to find specific pages - **Filter** the list to show only certain pages - **Show only untrained** to see pages that have not yet been processed ### Downloading Results Download the list of crawled URLs for your records or to review offline. ### Removing Unwanted Pages If the crawler picked up pages that are not relevant to your chatbot: - Delete individual pages from the list - Use **Clear untrained documents** to remove all pages that have not been processed yet --- ## Advanced Options Toggle the advanced options section to access additional configuration: - **SPA (Single Page Application) detection** -- Enable this if your website is built as a single-page application, which requires special handling to extract content properly --- ## Troubleshooting | Issue | Possible Cause | Solution | |-------|----------------|----------| | No content extracted | Website uses heavy JavaScript rendering | Try enabling SPA detection, or upload the content as documents instead | | Too many irrelevant pages | Crawl depth or max pages too high | Lower the depth and max pages settings, and add skip patterns | | Missing pages | Pages are behind authentication | Configure authentication settings and set crawl scope to include post-login pages | | Outdated content in chatbot | Website was updated after the crawl | Re-crawl your website to pick up the latest content | If you need further help, contact support at support@adaptivetelehealth.com. --- ## Next Steps - [Understanding Training](../part3-training/3.1-understanding-training.md) -- Learn how training works - [Document Management](../part3-training/3.2-document-management.md) -- Upload documents for training - [Q&A Overrides](../part3-training/3.4-qa-training.md) -- Define exact answers to specific questions - [Training Best Practices](../part3-training/3.5-training-best-practices.md) -- Tips for getting the best results --- # Training Best Practices Practical guidance for getting the best results from your chatbot training. --- ## Choosing Good Training Content The quality of your chatbot's responses depends directly on the content you provide. Follow these guidelines when selecting what to train your chatbot on: - **Use clear, well-written content** -- If the source material is confusing, the chatbot's answers will be too - **Organize information logically** -- Content with clear headings and structure produces better responses - **Include comprehensive coverage of your key topics** -- Make sure your most important subjects are well represented - **Keep content up to date** -- Review your training materials regularly and replace anything that has changed - **Remove outdated or contradictory information** -- Old content can cause the chatbot to give incorrect answers --- ## How Much Content to Upload ### Quality Over Quantity More content is not always better. A smaller set of clear, relevant documents will produce better results than a large collection of loosely related materials. ### Recommended Approach 1. **Start with your most important content** -- FAQs, service descriptions, pricing, policies, and contact information 2. **Add more content over time** as you identify gaps by reviewing chatbot conversations 3. **Remove irrelevant content** if you notice it causing off-topic or confusing responses ### Signs You Have Too Much Content - The chatbot pulls in unrelated information when answering questions - Responses include details from the wrong topic area - The chatbot gives conflicting answers to similar questions ### Signs You Need More Content - The chatbot frequently says it does not have enough information - Responses are too vague or generic - Visitors are asking about topics not covered by your training materials --- ## Structuring Q&A Overrides Q&A Overrides give you exact control over specific answers. Follow these tips to make them effective: - **Write questions the way your visitors would ask them** -- Use natural, everyday language rather than formal or internal phrasing - **Keep answers clear and concise** -- Provide the key information without overwhelming the reader - **Use overrides for must-be-exact information** -- Pricing, hours, contact details, and policies are ideal candidates - **Review and update overrides regularly** -- Make sure the information stays current, especially for time-sensitive details like hours and pricing ### Priority Topics for Q&A Overrides Create overrides for these common questions first: - Business hours and location - Contact information (phone, email) - Services offered - Pricing or payment information - How to schedule an appointment - Insurance or billing questions --- ## Using the Website Crawler Effectively The web crawler is a quick way to train your chatbot on existing website content. Get the most out of it with these tips: - **Start with your main content pages** -- Service pages, about pages, and FAQ sections are the most valuable - **Use skip patterns to avoid irrelevant pages** -- Add patterns like `/login`, `/admin`, `/cart`, and `/privacy-policy` to keep the crawl focused - **Set appropriate depth limits** -- Start with a depth of 2 or 3 to avoid crawling too deep into less relevant pages - **Review crawled pages before training** -- Check the list of crawled URLs and remove any pages that are not useful for your chatbot - **Re-crawl when your website changes** -- Run a new crawl periodically to pick up updated content --- ## When to Retrain Update your chatbot's training whenever your content changes. Common triggers include: - **After uploading new documents** -- New materials are processed automatically, but check that training completed successfully - **After updating existing content** -- Delete the old document and upload the updated version - **After adding or modifying Q&A Overrides** -- Changes take effect immediately - **If your chatbot starts giving outdated answers** -- Review your training materials and update anything that has changed - **After crawling new website pages** -- Newly crawled pages need to be processed before they are available to the chatbot --- ## Testing After Training Always test your chatbot after making training changes to verify the results. ### How to Test 1. Go to the **Sandbox** tab to test your chatbot 2. Ask questions you expect your visitors to ask 3. Verify the answers are accurate and helpful 4. Try different phrasings of the same question to see if the chatbot handles variations well ### What to Look For - **Accuracy** -- Are the facts in the response correct? - **Completeness** -- Does the response include all the important details? - **Relevance** -- Is the response about the right topic? - **Tone** -- Does the response sound natural and helpful? ### When Responses Need Improvement If you find a response that is not good enough: 1. Check whether the topic is covered in your training documents 2. If the content exists but the response is poor, consider adding a [Q&A Override](../part3-training/3.4-qa-training.md) for that specific question 3. If the content does not exist, upload a document or crawl a web page that covers the topic 4. Re-test to confirm the improvement --- ## Ongoing Maintenance Training is not a one-time task. Keep your chatbot performing well with regular maintenance: ### Regular Review - Check your chatbot's conversations periodically to spot questions it struggles with - Look for patterns -- if multiple visitors ask about the same topic and get poor answers, that topic needs better training - Update Q&A Overrides whenever key information changes (hours, pricing, contact details) ### Content Freshness - Remove outdated documents promptly - Re-crawl your website when pages are updated - Review all training content at least once per quarter ### Continuous Improvement The best chatbots improve over time. Use this cycle: 1. Review conversations and identify weak spots 2. Add or update training content to address those gaps 3. Test the changes in the Sandbox 4. Repeat regularly --- ## Next Steps - [Understanding Training](../part3-training/3.1-understanding-training.md) -- Learn how training works - [Document Management](../part3-training/3.2-document-management.md) -- Upload documents for training - [Website Crawler](../part3-training/3.3-website-crawler.md) -- Crawl your website content - [Q&A Overrides](../part3-training/3.4-qa-training.md) -- Define exact answers to specific questions --- # What is Live Agent Support? Live Agent Support is a paid addon ($49/month) that lets your team members chat directly with visitors on your website. When the AI chatbot can't fully help a visitor, or when a visitor requests a human, the conversation is handed off to one of your team members for real-time support. --- ## How It Works 1. A visitor chats with your AI chatbot on your website 2. The AI can't help, or the visitor requests a human 3. The conversation enters your support queue 4. A team member claims the conversation and responds in real time 5. The team member resolves the issue and closes the conversation with resolution notes ![Live Support Escalation Process](/images/live-support-escalation-diagram.jpg) --- ## Key Capabilities ### Conversation Queue When visitors request human support, they enter a queue and see their position in line along with an estimated wait time. Your team members see all waiting conversations and can claim them. ### Priority Levels Conversations can be assigned priority levels -- Low, Normal, High, or Urgent -- so your team can focus on the most important requests first. ### File Sharing Both your team members and visitors can exchange files and attachments during a live conversation. ### Offline Messages When no team members are available, visitors can leave a message with their contact information. Your team receives these messages and can follow up when back online. ### Visitor Ratings After a conversation ends, visitors can rate their experience using a 5-star rating system and leave comments. ### Real-Time Messaging Messages are delivered instantly with typing indicators and read receipts. Delivery status follows a WhatsApp-style pattern: Pending, Delivered, and Read. ### AI Preview Before connecting with a visitor, your team members can review the full AI conversation to understand what was already discussed and what the visitor needs. ### Connection Resilience If a connection drops, the system automatically reconnects and queues any messages sent during the disconnection. Conversations persist across page refreshes so nothing is lost. --- ## Getting Started To start using Live Agent Support: 1. Enable the addon from your subscription settings ($49/month) 2. Configure your [Support Hours and settings](./4.9-support-settings.md) 3. Invite team members and assign support permissions 4. Team members log into the [Support Dashboard](./4.2-agent-dashboard.md) and toggle Online to start receiving conversations For questions about Live Agent Support, contact support@adaptivetelehealth.com. --- ## Related Pages - [Your Support Dashboard](./4.2-agent-dashboard.md) - [Managing Your Support Queue](./4.3-managing-queue.md) - [Handling Live Conversations](./4.4-conversation-handling.md) - [Setting Up Live Agent Support](./4.9-support-settings.md) --- # Your Support Dashboard The Support Dashboard is where your team members manage live conversations with website visitors. It provides everything needed to monitor the queue, chat in real time, and handle offline messages. --- ## Dashboard Tabs The dashboard is organized into three main tabs: ### Active Conversations This tab shows all conversations that are currently in progress or waiting in the queue. When a visitor requests human support, their conversation appears here. Team members can claim waiting conversations and respond in real time. ### Closed Conversations This tab shows conversations that have been resolved. You can filter by date range to review past interactions, check resolution notes, and reference previous visitor questions. ### Offline Messages This tab collects messages left by visitors when no team members were available. Each message includes the visitor's contact information so you can follow up. See [When Your Team is Offline](./4.5-offline-mode.md) for more details. --- ## Online/Offline Toggle At the top of the dashboard, you'll find a toggle to set your availability: - **Online** -- You are available to receive and claim conversations. You will hear audio notifications for new chats and messages. - **Offline** -- You are unavailable. New conversations will not be assigned to you. See [Setting Your Availability](./4.6-agent-status.md) for more on managing your status. --- ## Queue Count Badge A badge on the Active tab shows how many conversations are currently waiting in the queue. This gives you an at-a-glance view of how busy the support queue is. --- ## AI Conversation Preview When you select a waiting or active conversation, you can see the full AI conversation that took place before the visitor requested human support. This lets you understand the visitor's question and what the chatbot already told them, so you don't ask them to repeat themselves. --- ## Audio Notifications The dashboard plays sound alerts when: - A new conversation enters the queue - A visitor sends a new message in one of your active conversations This helps you stay aware of incoming requests even if you're working in another browser tab. --- ## Messaging Tools ### Emoji Picker A built-in emoji picker is available in the message input area, so you can add expressive elements to your replies. ### File Sharing You can send and receive files during a conversation. Use the attachment button in the message input area to share documents, images, or other files with visitors. --- ## Related Pages - [What is Live Agent Support?](./4.1-overview.md) - [Managing Your Support Queue](./4.3-managing-queue.md) - [Handling Live Conversations](./4.4-conversation-handling.md) - [Setting Your Availability](./4.6-agent-status.md) --- # Managing Your Support Queue The support queue holds conversations from visitors who are waiting for a team member. Understanding how the queue works helps you provide fast, organized support. --- ## How Conversations Enter the Queue A conversation enters the queue when: - The AI chatbot escalates because it can't answer the visitor's question - The visitor clicks the "Talk to Human" button - The visitor explicitly requests a human in the chat Once in the queue, the visitor sees their position in line and an estimated wait time. --- ## Priority Levels Each conversation in the queue has a priority level: - **Urgent** -- Needs immediate attention. Appears at the top of the queue. - **High** -- Important. Appears above Normal and Low priority conversations. - **Normal** -- Standard priority. The default for most conversations. - **Low** -- Non-urgent. Appears at the bottom of the queue. Higher-priority conversations always appear before lower-priority ones, regardless of when they entered the queue. --- ## Claiming a Conversation To start helping a visitor, click the **Claim** button on their conversation in the queue. When you claim a conversation: 1. The conversation moves from the queue to your active conversations 2. The visitor is notified that a team member has connected 3. You can see the full AI conversation history for context 4. You can begin responding in real time **Tip:** Review the AI conversation preview before claiming so you understand what the visitor needs. --- ## Releasing a Conversation If you've claimed a conversation but realize you can't handle it -- for example, the question is outside your area of knowledge -- you can release it back to the queue. The conversation returns to the queue for another team member to claim. See [Transferring Conversations](./4.7-transfers-escalation.md) for details. --- ## Queue Position and Wait Times Visitors waiting in the queue see: - Their current position in line (e.g., "You are #3 in the queue") - An estimated wait time based on current activity These updates happen in real time, so visitors know their place is being held. --- ## Long Wait Options If a visitor has been waiting in the queue for an extended period, they may be offered alternatives such as leaving an offline message or returning to the AI chatbot. This prevents visitors from waiting indefinitely when the queue is busy. --- ## Related Pages - [Your Support Dashboard](./4.2-agent-dashboard.md) - [Handling Live Conversations](./4.4-conversation-handling.md) - [Setting Your Availability](./4.6-agent-status.md) - [Setting Up Live Agent Support](./4.9-support-settings.md) --- # Handling Live Conversations This guide walks through the full lifecycle of a live support conversation, from claiming it to resolving it. --- ## Step 1: Claim the Conversation Select a conversation from the queue and click **Claim**. The visitor is notified that a team member has joined. See [Managing Your Support Queue](./4.3-managing-queue.md) for more on the claiming process. --- ## Step 2: Review the AI Conversation Before responding, review the AI conversation history that appears in the chat window. This shows you: - What the visitor asked - What the AI chatbot responded - Where the AI couldn't help This context helps you pick up right where the AI left off without asking the visitor to repeat themselves. --- ## Step 3: Respond in Real Time Send messages to the visitor directly in the chat window. The visitor sees a typing indicator when you're composing a message, and you'll see one when they're typing. Messages are delivered instantly with read receipts so both sides know when messages have been seen. --- ## Step 4: Use Emoji The built-in emoji picker in the message input area lets you add a personal, friendly touch to your replies. --- ## Step 5: Share Files If the visitor needs a document, or if they need to send you one, use the file attachment button in the message input area. Both sides can send and receive files during the conversation. --- ## Step 6: Resolve the Conversation When the visitor's issue is fully addressed: 1. Confirm with the visitor that their question has been answered 2. Click the **Resolve** button to close the conversation 3. Add resolution notes describing what was discussed and how the issue was resolved Resolution notes are helpful for future reference if the visitor returns with a related question. --- ## Releasing a Conversation If you realize you can't fully help the visitor, you can release the conversation back to the queue for another team member to pick up. The visitor sees a message that they're being transferred. See [Transferring Conversations](./4.7-transfers-escalation.md) for more details. --- ## Returning to AI If the visitor's question has been answered and they have a new topic that the AI chatbot can handle, you can hand the conversation back to the AI. The visitor continues chatting with the chatbot as usual and can request a human again if needed. --- ## Related Pages - [Your Support Dashboard](./4.2-agent-dashboard.md) - [Managing Your Support Queue](./4.3-managing-queue.md) - [Transferring Conversations](./4.7-transfers-escalation.md) - [When Your Team is Offline](./4.5-offline-mode.md) --- # When Your Team is Offline When no team members are online, visitors can still reach out through the offline messaging system. This page explains what visitors experience and how your team can follow up. --- ## What Visitors See When a visitor requests human support and no team members are available, they see a customizable offline message. This message is configured in your [Support Hours settings](./4.9-support-settings.md). --- ## Offline Message Form Depending on your settings, visitors may be able to fill out an offline message form that collects: - Their name - Their email address - Their message or question This information is saved and appears in the **Offline Messages** tab of the [Support Dashboard](./4.2-agent-dashboard.md) so your team can follow up when they're back online. --- ## Email Notifications When a visitor submits an offline message, team members receive an email notification so they're aware a message is waiting. This ensures messages don't go unnoticed even when no one is actively checking the dashboard. --- ## Replying to Offline Messages When your team is back online, they can view all offline messages in the dashboard's Offline Messages tab. From there, team members can reply to visitors and mark messages as handled. --- ## Offline Behavior Options In your [Support Hours settings](./4.9-support-settings.md), you can choose what happens when your team is offline: 1. **Show offline message and form** -- Visitors see your offline message and can submit a message form with their contact details. 2. **Show offline message only** -- Visitors see your offline message but cannot submit a form. 3. **Hide live chat option** -- The option to request human support is hidden entirely when no team members are available. Choose the option that best fits your support workflow. --- ## Related Pages - [Setting Your Availability](./4.6-agent-status.md) - [Handling Live Conversations](./4.4-conversation-handling.md) - [Setting Up Live Agent Support](./4.9-support-settings.md) - [Managing Your Support Queue](./4.3-managing-queue.md) --- # Setting Your Availability Your availability status controls whether you receive new support conversations. The Online/Offline toggle is located at the top of the [Support Dashboard](./4.2-agent-dashboard.md). --- ## Online When you set your status to **Online**: - You appear as available in the support system - New conversations can be assigned to you - You can claim conversations from the queue - You receive audio notifications for new chats and incoming messages --- ## Offline When you set your status to **Offline**: - You appear as unavailable in the support system - New conversations will not be assigned to you - You cannot claim conversations from the queue - Any conversations you are currently handling continue until you resolve them --- ## When to Toggle **Set yourself to Online** when you are actively available to handle support conversations. **Set yourself to Offline** when you are done for the day, stepping away, or otherwise unable to respond to new conversations. If you are in the middle of a conversation, it will continue normally -- only new conversations are affected. --- ## Related Pages - [Your Support Dashboard](./4.2-agent-dashboard.md) - [Managing Your Support Queue](./4.3-managing-queue.md) - [When Your Team is Offline](./4.5-offline-mode.md) - [Setting Up Live Agent Support](./4.9-support-settings.md) --- # Transferring Conversations If you've claimed a conversation but need another team member to handle it, you can transfer it through the queue. --- ## How to Transfer a Conversation 1. **Release the conversation** back to the queue from your active conversations 2. The visitor sees a message that they are being transferred to another team member 3. Another team member claims the conversation from the queue 4. The new team member can see the full conversation history, including your messages and the original AI conversation --- ## When to Transfer Common reasons to transfer a conversation: - The visitor's question is outside your area of expertise - Your shift is ending and the visitor still needs help - The visitor requests a different team member - You have too many active conversations and another team member is available --- ## What the New Team Member Sees When another team member claims the transferred conversation, they have access to: - The full AI conversation that happened before the visitor requested human support - All messages exchanged between you and the visitor - Any resolution notes or context you added This means the visitor doesn't need to repeat their question or re-explain their situation. --- ## Related Pages - [Handling Live Conversations](./4.4-conversation-handling.md) - [Setting Your Availability](./4.6-agent-status.md) - [Managing Your Support Queue](./4.3-managing-queue.md) - [Setting Up Live Agent Support](./4.9-support-settings.md) --- # Setting Up Live Agent Support This guide walks through the steps to configure Live Agent Support for your chatbot. --- ## Step 1: Enable the Addon Live Agent Support is a paid addon at $49/month. Enable it from your subscription settings. Once active, you can access the configuration options described below. --- ## Step 2: Configure Support Hours Support Hours let you define when your team is available for live support. Navigate to the Support Hours settings in your chatbot configuration. ### Master Toggle A master toggle enables or disables Support Hours scheduling. When disabled, live support availability is based solely on whether team members are toggled Online. ### Timezone Select the timezone your schedule should follow. All start and end times are interpreted in this timezone. ### Weekly Schedule Set your team's availability for each day of the week -- Monday through Sunday. For each day, configure: - Whether the day is enabled or disabled - Start time (e.g., 8:00 AM) - End time (e.g., 5:00 PM) Outside of scheduled hours, the system automatically switches to offline mode. ### Offline Message Customize the message visitors see when your team is unavailable. This message appears when a visitor requests human support outside of your configured hours or when no team members are online. ### Offline Behavior Choose what happens when your team is offline: 1. **Allow offline message form** -- Visitors see your offline message and can submit their contact details and a message for follow-up. 2. **Show message only** -- Visitors see your offline message but cannot submit a form. 3. **Hide chat** -- The option to request human support is hidden entirely when the team is offline. ### "All Agents Offline" Message Customize a separate message that displays when all team members go offline during scheduled support hours. This lets you provide different messaging for unexpected unavailability versus planned off-hours. --- ## Step 3: Set Up Offline Messages Configure how offline messages are handled: - Customize the offline message text visitors see - Choose your offline behavior (form, message only, or hide chat) - Team members receive email notifications when visitors leave offline messages See [When Your Team is Offline](./4.5-offline-mode.md) for more details on how the offline system works. --- ## Step 4: Invite Team Members Add team members who will handle live support conversations: 1. Invite team members to your account 2. Assign them a permission profile that includes support access 3. Team members can then log into the [Support Dashboard](./4.2-agent-dashboard.md) and toggle Online to start receiving conversations --- ## Step 5: Go Live Once your settings are configured and team members are set up: 1. Team members log into the Support Dashboard 2. They toggle their status to **Online** 3. Visitors who request human support are connected to available team members For questions about setup, contact support@adaptivetelehealth.com. --- ## Related Pages - [What is Live Agent Support?](./4.1-overview.md) - [Your Support Dashboard](./4.2-agent-dashboard.md) - [When Your Team is Offline](./4.5-offline-mode.md) - [Setting Your Availability](./4.6-agent-status.md) --- # Analytics Dashboard Overview Your Analytics tab provides a comprehensive view of how your chatbot is performing, with real-time metrics, interactive charts, and trend data to help you make informed decisions about your chatbot's training and configuration. --- ## Accessing the Analytics Dashboard To view your analytics: 1. Log into your account and open your chatbot 2. Click the **Analytics** tab 3. The dashboard loads with the last 30 days of data by default --- ## Dashboard Metrics The top of the dashboard displays key performance numbers at a glance. ### Conversation and Message Totals | Metric | What It Shows | |--------|---------------| | **Total Conversations** | The total number of chat sessions visitors have started | | **Total Messages** | All messages exchanged between visitors and your chatbot | | **Unique Users** | The number of distinct visitors who used your chatbot | ### Response Performance | Metric | What It Shows | |--------|---------------| | **Average Response Time** | How quickly your chatbot typically replies to visitors | | **Min Response Time** | The fastest response recorded in the selected period | | **Max Response Time** | The slowest response recorded in the selected period | | **Fast Response Rate** | The percentage of responses delivered quickly | | **Average Message Length** | The typical length of messages in conversations | ### Activity Summary | Metric | What It Shows | |--------|---------------| | **Active Days** | Number of days your chatbot had at least one conversation | | **Messages Today** | Messages exchanged so far today | | **Messages This Week** | Messages exchanged in the current week | | **Messages This Month** | Messages exchanged in the current month | ### Engagement Metrics | Metric | What It Shows | |--------|---------------| | **Conversations Per Day** | Average number of daily conversations | | **Messages Per Conversation** | Average depth of visitor interactions | | **Total Tokens Used** | The total number of AI tokens consumed across all conversations | | **Total Documents** | Number of training documents powering your chatbot | --- ## Charts and Visualizations Below the metric cards, the dashboard includes several interactive charts that help you visualize trends and patterns. ### Daily Activity Chart A line chart showing daily trends for: - **Messages** sent each day - **Unique users** per day - **Sessions** started each day This chart helps you identify busy days, spot trends, and understand how visitor activity changes over time. ### Hourly Activity Chart Displays two data points by hour of the day: - **Messages** received each hour - **Response time** averages each hour Use this to understand when your chatbot is busiest and whether response times vary throughout the day. ### Topics Breakdown A pie chart showing the distribution of conversation topics. This helps you understand what visitors are asking about most, so you can prioritize training content for those areas. ### Response Time Distribution A bar chart showing how response times are distributed across ranges. You can quickly see whether most responses are fast or whether there are slower outliers that may need attention. ### Performance Radar Chart A multi-axis radar chart that gives you a visual summary of your chatbot's overall performance across several dimensions at once. --- ## Dashboard Controls ### Date Range Filter By default, the dashboard shows the last 30 days of data. You can adjust this using the date range filter: - Select from preset ranges or choose custom start and end dates - The entire dashboard updates to reflect your selected period ### Auto-Refresh Toggle auto-refresh to have the dashboard update automatically every 30 seconds. This is useful for monitoring activity in real time during busy periods. ### Download and Export Click the download button to export your current analytics data. This saves the metrics and chart data displayed on your dashboard. ### Manual Refresh Click the refresh button at any time to reload the dashboard with the latest data. --- ## Tips for Reading Your Dashboard - **Look for trends over time** rather than focusing on individual days. A single quiet day is normal, but a sustained decline may indicate an issue. - **Compare time periods** by changing the date range to see how this month compares to last month. - **Check the hourly chart** to understand when visitors are most active. This can inform when you update training content or monitor conversations. - **Review the topics breakdown** regularly to make sure your training content covers what visitors are actually asking about. --- ## Related Guides - [Conversation Analytics](../part5-analytics/5.2-conversation-analytics.md) - [Performance Metrics](../part5-analytics/5.3-performance-metrics.md) - [Visitor Insights](../part5-analytics/5.4-user-insights.md) - [Exporting Your Data](../part5-analytics/5.5-export-reports.md) --- # Conversation Analytics The Conversations tab in your chatbot management area lets you browse, search, and review every conversation your chatbot has had with visitors. You can filter by date and lead status, drill into individual messages, edit AI responses to create overrides, and export conversation data. --- ## Browsing Your Conversations When you open the Conversations tab, you see a list of all conversations your chatbot has had. ### What the Conversation List Shows Each conversation in the list displays: | Field | Description | |-------|-------------| | **Session ID** | A unique identifier for the conversation | | **First Message Preview** | The opening message from the visitor | | **Last Message Preview** | The most recent message in the conversation | | **Message Count** | Total number of messages exchanged | | **Created Date** | When the conversation started | | **Updated Date** | When the last message was sent | | **Lead Info** | If the visitor provided contact details: name, email, phone, and company | | **Tokens Used** | The number of input and output tokens consumed | The total number of conversations matching your current filters is displayed at the top of the list. --- ## Searching and Filtering ### Search Bar Use the search bar to find specific conversations by keyword. This searches across message content, session IDs, and lead information. ### Lead Filter Filter conversations to show: - **All conversations** -- every conversation regardless of lead status - **Leads only** -- only conversations where the visitor provided contact information - **Non-leads only** -- conversations from anonymous visitors ### Date Filter Narrow your results by time period: - **Today** -- conversations from today only - **This Week** -- conversations from the current week - **This Month** -- conversations from the current month - **Custom Range** -- select specific start and end dates --- ## Viewing Conversation Details Click on any conversation to expand it and see the full message history. ### Message Details Each message in the expanded view shows: - **Message content** with full markdown formatting - **Token usage** -- input and output tokens for each AI response - **Response time** -- how long the chatbot took to respond - **Override indicator** -- a marker showing if the AI response has been manually edited ### Inline Response Editing If you notice an AI response that could be improved, you can edit it directly from the conversation view: 1. Find the AI response you want to improve 2. Click the **edit** button on that response 3. Modify the response text 4. Save your changes This creates a Q&A override, meaning the next time a visitor asks a similar question, your edited response will be used instead of the AI-generated one. This is a powerful way to continuously improve your chatbot's accuracy based on real conversations. --- ## Exporting Conversations You can export your conversation data in two formats. ### CSV Export Export conversation data as a CSV file for analysis in spreadsheet applications. The CSV includes conversation metadata, message counts, dates, lead information, and token usage. To export as CSV: 1. Apply any filters you want (date range, lead status) 2. Click the **Export CSV** button 3. A progress indicator shows the export status 4. The file downloads automatically when ready ### PDF Export Export individual conversation transcripts as PDF files, which are useful for sharing or record-keeping. To export as PDF: 1. Open the conversation you want to export 2. Click the **Export PDF** button 3. The transcript downloads as a formatted PDF document Both export types include a progress tracker so you can see the status of your export. --- ## Using Conversation Data Effectively - **Review conversations regularly** to understand what visitors are asking and how well your chatbot responds. - **Look for patterns** in unanswered or poorly answered questions, then add training content to address those gaps. - **Use inline editing** to create Q&A overrides for questions your chatbot struggles with -- this immediately improves future responses. - **Export conversations** periodically for team review or to share insights with colleagues. --- ## Related Guides - [Dashboard Overview](../part5-analytics/5.1-dashboard-overview.md) - [Performance Metrics](../part5-analytics/5.3-performance-metrics.md) - [Visitor Insights](../part5-analytics/5.4-user-insights.md) - [Training with Q&A Pairs](../part3-training/3.4-qa-training.md) --- # Understanding How Your Chatbot is Performing Your Analytics dashboard includes several performance metrics that help you understand how effectively your chatbot is serving visitors. This guide explains what each metric means and how to interpret the data. --- ## Response Time Response time measures how quickly your chatbot replies to visitor messages. A fast response time keeps visitors engaged and creates a smooth conversational experience. ### What You See on the Dashboard - **Average Response Time** -- the typical time between a visitor sending a message and receiving a reply - **Min and Max Response Time** -- the fastest and slowest responses recorded in your selected date range - **Response Time Distribution Chart** -- a bar chart showing how response times are spread across different ranges ### How to Read the Distribution Chart The response time distribution chart groups responses into time ranges (for example, under 1 second, 1-2 seconds, 2-5 seconds, and so on). A healthy chatbot shows most responses clustered in the faster ranges. If you see a significant number of responses in the slower ranges, it may indicate that certain types of questions are taking longer to process. --- ## Fast Response Rate The fast response rate is the percentage of all responses that were delivered quickly. A high fast response rate means your chatbot is consistently giving visitors prompt replies. This metric appears as a percentage on your dashboard. For example, a fast response rate of 92% means that 92 out of every 100 responses were delivered within the fast response threshold. --- ## Conversations Per Day This metric shows the average number of conversations your chatbot handles each day over your selected time period. ### What to Look For - **Steady growth** suggests your chatbot is getting more visibility and use - **Sudden spikes** may correspond to marketing campaigns, website changes, or seasonal traffic - **Declines** could indicate widget visibility issues or changes to your website traffic The daily messages and sessions line chart on the dashboard helps you visualize these trends over time. --- ## Messages Per Conversation This metric tells you the average number of messages exchanged in each conversation. It reflects how deeply visitors are engaging with your chatbot. ### Interpreting This Number - **Low numbers (1-2 messages)** may mean visitors are getting quick answers, or they may be leaving without getting the help they need. Review your conversations to understand which case applies. - **Moderate numbers (3-5 messages)** typically indicate healthy engagement where visitors are asking questions and receiving useful follow-up responses. - **High numbers (6+ messages)** could mean visitors are having in-depth conversations, or it could indicate the chatbot is struggling to provide a clear answer and the visitor keeps rephrasing. --- ## Usage Statistics Your dashboard summarizes overall message volumes and activity patterns across several time windows: | Metric | What It Tells You | |--------|-------------------| | **Messages Today** | Current day's activity level | | **Messages This Week** | Weekly activity trend | | **Messages This Month** | Monthly activity overview | | **Active Days** | How many days in the period had at least one conversation | | **Unique Users** | Number of distinct visitors using your chatbot | ### Hourly Activity Patterns The hourly chart on your dashboard shows when visitors are most active. This can help you understand your audience's behavior -- for example, whether most interactions happen during business hours or in the evening. --- ## Using Performance Data to Improve Your Chatbot - **If response times are slow**, review your training documents. Very large documents or a high volume of training content can sometimes affect processing time. - **If conversations per day are low**, check that your widget is properly configured and visible on your website. Review your [widget settings](../part2-chatbot-config/2.5-widget-behavior.md) for placement and visibility options. - **If messages per conversation seem too high**, browse recent conversations in the [Conversations tab](../part5-analytics/5.2-conversation-analytics.md) to see if visitors are struggling to get clear answers. Add training content or Q&A overrides for common problem areas. - **Check the topics breakdown** on your dashboard to make sure your training content covers the subjects visitors ask about most. --- ## Related Guides - [Dashboard Overview](../part5-analytics/5.1-dashboard-overview.md) - [Conversation Analytics](../part5-analytics/5.2-conversation-analytics.md) - [Visitor Insights](../part5-analytics/5.4-user-insights.md) - [Training Best Practices](../part3-training/3.5-training-best-practices.md) --- # Visitor Insights Your chatbot captures information about the visitors it interacts with. The Leads section helps you track who is engaging with your chatbot, manage contact information collected through lead capture forms, and export lead data for follow-up. --- ## Unique Visitors Your Analytics dashboard displays the total number of unique visitors who have interacted with your chatbot during the selected date range. This count is based on distinct visitor sessions, giving you a sense of how many individual people are using your chatbot. --- ## Lead Capture Statistics When you have lead capture enabled on your chatbot, the Leads section provides an overview of your captured contacts. ### Lead Summary Metrics | Metric | What It Shows | |--------|---------------| | **Total Leads** | The total number of visitors who have submitted their contact information | | **New Today** | Leads captured today | | **New This Week** | Leads captured in the current week | | **Identified Leads** | Visitors who provided contact details | | **Anonymous Leads** | Visitors who interacted but did not provide contact details | | **Average Sessions Per Lead** | How many times, on average, each lead has returned to chat | | **Conversion Rate** | The percentage of chatbot visitors who become identified leads | --- ## Managing Your Leads The Leads section includes tools for searching, filtering, and organizing your captured contacts. ### Searching Leads Use the search bar to find specific leads by: - **Name** -- the name the visitor provided - **Email** -- their email address - **Company** -- the company name, if provided ### Filtering Leads Narrow your lead list using the available filters: **Status Filter:** | Status | Meaning | |--------|---------| | **New** | Recently captured, not yet reviewed | | **Contacted** | You have reached out to this lead | | **Qualified** | This lead has been assessed as a good fit | | **Converted** | This lead became a customer or completed your desired action | | **Archived** | No longer active, kept for records | **Date Range Filter:** Filter leads by when they were captured, using preset ranges or custom dates. --- ## Viewing Lead Details Click on any lead to open the lead detail modal, which shows: - **Contact information** -- name, email, phone number, and company - **Conversation history** -- a summary of the conversations this visitor has had with your chatbot - **Lead status** -- their current status in your workflow - **Notes** -- any notes you or your team have added ### Editing Lead Notes In the lead detail modal, you can add or edit notes for each lead. Use this to record follow-up actions, conversation summaries, or any other relevant information your team needs. 1. Open the lead detail modal 2. Find the Notes section 3. Type or edit your notes 4. Save your changes Notes are visible to all team members who have access to the Leads section. --- ## Exporting Lead Data You can export lead information as a PDF document for sharing with your team or for your records. 1. Navigate to the lead you want to export, or apply filters to narrow the list 2. Click the **Export PDF** button 3. The PDF includes contact details, lead status, and notes --- ## Getting the Most from Visitor Insights - **Review new leads promptly** -- visitors who provide their contact information are expressing interest. Timely follow-up improves conversion rates. - **Use status labels consistently** -- keeping lead statuses up to date helps your team stay organized and avoids duplicate outreach. - **Check your conversion rate** -- if it is lower than expected, review your lead capture form settings. Asking for fewer fields or adjusting when the form appears can improve completion rates. See [Contact Forms](../part2-chatbot-config/2.7-contact-forms.md) for configuration options. - **Monitor returning visitors** -- a high average sessions per lead indicates visitors find your chatbot useful and come back regularly. --- ## Related Guides - [Dashboard Overview](../part5-analytics/5.1-dashboard-overview.md) - [Conversation Analytics](../part5-analytics/5.2-conversation-analytics.md) - [Performance Metrics](../part5-analytics/5.3-performance-metrics.md) - [Exporting Your Data](../part5-analytics/5.5-export-reports.md) --- # Exporting Your Data You can export conversation data, analytics metrics, and lead information from the platform. This guide covers the export capabilities that are currently available. --- ## Available Exports ### CSV Export -- Conversation Data Export your conversation data as a CSV file from the Conversations tab. The CSV includes conversation metadata such as session IDs, message counts, timestamps, lead information, and token usage. **How to export conversations as CSV:** 1. Go to your chatbot's **Conversations** tab 2. Apply any filters you want -- date range, lead status, or search terms 3. Click the **Export CSV** button 4. A progress indicator shows the export status 5. The CSV file downloads automatically when ready CSV files can be opened in any spreadsheet application (Google Sheets, Microsoft Excel, Numbers) for further analysis. ### PDF Export -- Conversation Transcripts Export individual conversation transcripts as formatted PDF documents. This is useful for sharing specific conversations with team members or for record-keeping. **How to export a conversation as PDF:** 1. Go to your chatbot's **Conversations** tab 2. Click on the conversation you want to export 3. Click the **Export PDF** button 4. The transcript downloads as a PDF The PDF includes the full message history with timestamps, sender information, and any lead details associated with the conversation. ### Analytics Download Download the metrics and chart data from your Analytics dashboard. **How to download analytics data:** 1. Go to your chatbot's **Analytics** tab 2. Set your desired date range and filters 3. Click the **Download** button 4. The data from your current dashboard view is exported ### Lead Export Export lead information as a PDF document from the Leads section. **How to export lead data:** 1. Go to your Leads section 2. Apply any filters (status, date range, search) 3. Click the **Export PDF** button 4. The PDF includes contact details, lead status, and notes --- ## Tips for Working with Exports - **Filter before exporting** to keep your files focused on the data you need. Exporting all conversations since the beginning of time creates unnecessarily large files. - **Export regularly** if you need to keep records for compliance or reporting purposes. - **Use CSV exports for analysis** when you want to sort, filter, or create charts from your conversation data in a spreadsheet. - **Use PDF exports for sharing** when you need to send a specific conversation transcript or lead summary to someone who does not have platform access. --- ## Need Help? If you have questions about exporting your data or need assistance with a specific export, contact us at support@adaptivetelehealth.com. --- ## Related Guides - [Dashboard Overview](../part5-analytics/5.1-dashboard-overview.md) - [Conversation Analytics](../part5-analytics/5.2-conversation-analytics.md) - [Performance Metrics](../part5-analytics/5.3-performance-metrics.md) - [Visitor Insights](../part5-analytics/5.4-user-insights.md) --- # Managing Your Team The Team Members page lets you invite people in your organization to access the chatbot platform, assign them Permission Profiles that control what they can do, and manage pending invitations. Team management is available to account Owners and Admins. --- ## Viewing Your Team The Team Members page displays a table of everyone in your organization who has access to the platform. | Column | What It Shows | |--------|---------------| | **Name** | The team member's full name | | **Email** | Their email address | | **Permission Profile** | The profile assigned to them (Admin, Editor, or Viewer) | | **Status** | Whether they are Active or Pending (invitation not yet accepted) | | **Joined Date** | When they accepted their invitation and created their account | | **Last Login** | The most recent time they logged in | --- ## Inviting a Team Member To add someone to your team: 1. Go to the **Team Members** page 2. Click **Invite Team Member** 3. Enter the person's email address 4. Select a **Permission Profile** from the dropdown (Admin, Editor, or Viewer) 5. Click **Send Invitation** The person receives an email invitation with a link to create their account. Once they accept, their status changes from Pending to Active and they can log in with the permissions you assigned. For details on what each Permission Profile allows, see [Team Permissions](../part6-team-account/6.2-roles-permissions.md). --- ## Editing a Team Member To change a team member's Permission Profile: 1. Find the member in the Team Members table 2. Click the **Edit** button on their row 3. Select a different Permission Profile from the dropdown 4. Save your changes The member's access updates immediately. They do not need to log out and back in for the change to take effect. --- ## Removing a Team Member To remove someone from your team: 1. Find the member in the Team Members table 2. Click the **Remove** button 3. A confirmation dialog appears asking you to confirm the removal 4. Confirm to remove the member Once removed, the person can no longer log in or access any part of the platform. --- ## Managing Pending Invitations Below the active team members table, you can see a table of pending invitations. | Column | What It Shows | |--------|---------------| | **Email** | The email address the invitation was sent to | | **Permission Profile** | The profile that was assigned | | **Sent Date** | When the invitation was sent | | **Status** | Whether the invitation is Pending or Expired | ### Actions for Pending Invitations - **Resend** -- send the invitation email again, useful if the original was missed or went to spam - **Cancel** -- withdraw the invitation so it can no longer be accepted --- ## Need Help? If you have questions about managing your team, contact us at support@adaptivetelehealth.com. --- ## Related Guides - [Team Permissions](../part6-team-account/6.2-roles-permissions.md) - [Your Account Settings](../part6-team-account/6.3-organization-settings.md) - [Securing Your Account](../part6-team-account/6.4-account-security.md) - [Your Profile](../part6-team-account/6.5-profile-settings.md) --- # Team Permissions When you invite a team member, you assign them a Permission Profile that controls what they can access and do within the platform. This guide explains the available profiles and what each one allows. --- ## How Permission Profiles Work Every team member is assigned exactly one Permission Profile. The profile determines which areas of the platform they can see and interact with. You select the profile from a dropdown when inviting a new member, and you can change it later from the Team Members page. --- ## Available Permission Profiles ### Admin Full access to all features in the platform. Admins can manage chatbots, training content, analytics, conversations, widget settings, billing, and team members. **Best for:** Co-owners, managers, or anyone who needs unrestricted access to the platform. ### Editor Can create and edit chatbots, manage documents and training content, view analytics, and review conversations. Editors cannot manage billing, subscription settings, or team members. **Best for:** Team members who are responsible for building and maintaining your chatbot's content and configuration. ### Viewer Read-only access to chatbots, analytics, and conversations. Viewers cannot make changes to any settings, training content, or configurations. **Best for:** Team members who need to monitor chatbot performance or review conversations without making changes. ### Custom Profiles Your organization may also have custom Permission Profiles that were configured by the platform administrator. These custom profiles combine specific permissions tailored to particular roles in your organization. If you see additional profiles in the dropdown when inviting a team member, they were created to fit your organization's needs. --- ## What Each Profile Can Access | Feature Area | Admin | Editor | Viewer | |-------------|-------|--------|--------| | View Chatbots | Yes | Yes | Yes | | Edit Chatbots | Yes | Yes | No | | Train Chatbots (documents, Q&A, crawling) | Yes | Yes | No | | Deploy and Configure Widgets | Yes | Yes | No | | View Analytics and Dashboard | Yes | Yes | Yes | | View Conversations | Yes | Yes | Yes | | Manage Documents | Yes | Yes | No | | Billing and Subscription | Yes | No | No | | Widget Configuration | Yes | Yes | No | | Team Management (invite, edit, remove) | Yes | No | No | --- ## Changing a Team Member's Profile If someone's responsibilities change, you can update their Permission Profile: 1. Go to the **Team Members** page 2. Click **Edit** on the member's row 3. Select a different Permission Profile from the dropdown 4. Save your changes The change takes effect immediately. --- ## Choosing the Right Profile - **Start with the least access needed.** If someone only needs to review analytics, assign the Viewer profile. You can always upgrade them later. - **Use Editor for content contributors.** If someone manages your chatbot's training documents and Q&A pairs but does not need to handle billing or team settings, the Editor profile is the right choice. - **Reserve Admin for people who need full control.** Admin access includes billing and team management, so limit this to people who genuinely need those capabilities. --- ## Need Help? If you have questions about Permission Profiles or need assistance deciding which profile to assign, contact us at support@adaptivetelehealth.com. --- ## Related Guides - [Managing Your Team](../part6-team-account/6.1-user-management.md) - [Your Account Settings](../part6-team-account/6.3-organization-settings.md) - [Securing Your Account](../part6-team-account/6.4-account-security.md) - [Your Profile](../part6-team-account/6.5-profile-settings.md) --- # Your Account Settings The Account page is where you manage your organization's information, review your plan, and configure account-level preferences. --- ## Account Information The Account page displays and lets you edit your organization's core details: | Field | Description | |-------|-------------| | **Organization Name** | Your company or practice name as it appears across the platform | | **Domain** | Your organization's website domain | ### Organization Details Additional information about your organization that helps us serve you better. These details are used for account identification and support purposes. ### Plan Information Your current subscription plan is displayed on the Account page. This shows which plan you are on and what is included. For details about available plans and features, see [Subscription Plans](../part7-billing/7.1-subscription-plans.md). ### Billing Contact The billing contact information determines who receives invoices and billing-related communications. You can update this if the responsible person changes in your organization. --- ## Notification Preferences Configure how your organization receives notifications from the platform. Notification preferences let you control which types of alerts and updates are sent and how they are delivered. --- ## Updating Your Settings 1. Go to the **Account** page 2. Edit the fields you want to change 3. Save your changes Changes to your organization name and other details are reflected across the platform immediately. --- ## Need Help? If you need to make changes to your account that are not available through the settings page, or if you have questions about your plan, contact us at support@adaptivetelehealth.com. --- ## Related Guides - [Managing Your Team](../part6-team-account/6.1-user-management.md) - [Team Permissions](../part6-team-account/6.2-roles-permissions.md) - [Securing Your Account](../part6-team-account/6.4-account-security.md) - [Your Profile](../part6-team-account/6.5-profile-settings.md) --- # Securing Your Account Keeping your account secure protects your organization's data and your visitors' information. This guide covers Two-Factor Authentication, session management, and password requirements. --- ## Two-Factor Authentication (2FA) Two-Factor Authentication adds an extra layer of security to your account. With 2FA enabled, logging in requires both your password and a verification code from an authenticator app on your phone. ### Enabling 2FA 1. Go to your **Account** page 2. Find the **Two-Factor Authentication** section 3. Click **Enable 2FA** 4. A modal appears with: - **QR code** -- scan this with your authenticator app (Google Authenticator, Authy, Microsoft Authenticator, or any TOTP-compatible app) - **Text secret key** -- if you cannot scan the QR code, enter this key manually in your authenticator app - **10 backup codes** -- save these in a safe place immediately (see Backup Codes below) 5. Open your authenticator app and enter the 6-digit code it displays 6. Click **Confirm** to complete setup From this point on, you will be asked for a verification code each time you log in. ### Disabling 2FA If you need to disable Two-Factor Authentication: 1. Go to the Two-Factor Authentication section on your Account page 2. Click **Disable 2FA** 3. Enter your password to confirm 4. 2FA is turned off ### Backup Codes When you enable 2FA, the system generates 10 one-time-use backup codes. These codes let you log in if you lose access to your authenticator app (for example, if your phone is lost or reset). **Important details about backup codes:** - Each code can only be used once - A counter shows how many codes you have remaining - You can regenerate a new set of backup codes at any time (this invalidates any unused codes from the previous set) - Store your backup codes somewhere safe and separate from your phone -- a password manager, a printed copy in a secure location, or a secure note --- ## Session Management ### Auto-Logout Your account automatically logs you out after a period of inactivity. This protects your account if you step away from your computer without logging out. ### Viewing Active Sessions You can see all the places where your account is currently logged in. Each session shows the device, browser, and when it was last active. ### Ending Sessions If you see a session you do not recognize, or if you want to log out of a specific device: - **End a single session** -- click the log out button next to that session - **End all sessions** -- log out of every session at once, which is useful if you suspect unauthorized access After ending all sessions, you will need to log in again on every device. --- ## Password Requirements Your password must meet the following requirements: - **Minimum 8 characters** in length - Must include at least one **symbol** (such as !, @, #, $, %) - Must include at least one **uppercase letter** - Must include at least one **lowercase letter** - Must include at least one **number** ### Tips for a Strong Password - Use a password manager to generate and store strong, unique passwords - Do not reuse passwords from other websites or services - Avoid using personal information like your name, birthday, or common words - Longer passwords are generally more secure -- consider using 12 or more characters --- ## What to Do If You Suspect Unauthorized Access 1. Change your password immediately 2. Review your active sessions and end any you do not recognize 3. Enable 2FA if it is not already turned on 4. Check your account settings for any unexpected changes 5. Contact us at support@adaptivetelehealth.com if you need further assistance --- ## Related Guides - [Managing Your Team](../part6-team-account/6.1-user-management.md) - [Team Permissions](../part6-team-account/6.2-roles-permissions.md) - [Your Account Settings](../part6-team-account/6.3-organization-settings.md) - [Your Profile](../part6-team-account/6.5-profile-settings.md) --- # Your Profile Your Profile page is where you manage your personal information, update your password, and configure display preferences. These settings apply to your individual account and do not affect other team members. --- ## Profile Information Your profile displays the following fields: | Field | Description | |-------|-------------| | **Avatar** | Your profile picture, displayed next to your name throughout the platform | | **Full Name** | Your name as it appears to team members (editable) | | **Email Address** | The email you use to log in (read-only -- cannot be changed) | | **Phone Number** | Your contact phone number (optional) | | **Time Zone** | Your preferred time zone for displaying dates and times | | **Created Date** | When your account was created (display only) | | **Last Login** | The most recent time you logged in (display only) | ### Editing Your Profile 1. Go to your **Profile** page 2. Update your Full Name, Phone Number, or Time Zone as needed 3. Save your changes Your email address is shown for reference but cannot be changed from this page. ### Setting Your Time Zone Select your time zone from the dropdown to ensure all dates and times displayed in the platform are shown in your local time. This is especially important if your team spans multiple time zones. --- ## Changing Your Password To update your password: 1. Go to your **Profile** page 2. Find the password change section 3. Enter your **current password** 4. Enter your **new password** 5. Enter your new password again to **confirm** it 6. Save your changes Each password field has a show/hide toggle so you can verify what you are typing. Your new password must meet the platform's password requirements: minimum 8 characters, including at least one symbol, one uppercase letter, one lowercase letter, and one number. For more details, see [Securing Your Account](../part6-team-account/6.4-account-security.md). --- ## Need Help? If you have questions about your profile settings or need to update information that is not editable from this page, contact us at support@adaptivetelehealth.com. --- ## Related Guides - [Managing Your Team](../part6-team-account/6.1-user-management.md) - [Team Permissions](../part6-team-account/6.2-roles-permissions.md) - [Your Account Settings](../part6-team-account/6.3-organization-settings.md) - [Securing Your Account](../part6-team-account/6.4-account-security.md) --- # Subscription Plans Choose the plan that fits your organization's needs and scale as you grow. --- ## Available Plans Adaptive Health AI offers several subscription tiers designed for different organization sizes. For current plan details and pricing, visit the pricing page on our website. Plans differ based on: - **Number of Chatbots** -- How many chatbots you can create and deploy - **Message Limits** -- Monthly messages across all your chatbots - **Document Storage** -- Space for training documents and uploaded files - **Training Runs** -- How often you can retrain your chatbots with updated content - **Team Members** -- Number of user accounts with dashboard access --- ## What Every Plan Includes Regardless of which plan you choose, you get access to these core features: - **HIPAA-Compliant Infrastructure** -- Your data is protected on a secure, compliant platform - **Business Associate Agreement (BAA)** -- Included with all plans at no additional cost - **Email Support** -- Reach our team at support@adaptivetelehealth.com - **Widget Customization** -- Match your chatbot's appearance to your brand - **Analytics Dashboard** -- Track conversations, usage, and chatbot performance --- ## Higher-Tier Benefits As you move to higher-tier plans, you unlock additional capabilities such as: - Additional chatbots for different departments or use cases - More document storage and training capacity - Priority support with faster response times For a detailed feature comparison across all plans, visit the pricing page on our website. --- ## Free Trial All plans include a **14-day free trial** so you can explore the platform before committing. Your card is validated during registration, but you will not be charged until the trial period ends. During the trial, you have full access to your selected plan's features. If the plan is not the right fit, you can switch plans or cancel before the trial ends. --- ## Billing Cycles Two billing options are available for every plan: - **Monthly Billing** -- Pay month-to-month with the flexibility to change plans each cycle - **Annual Billing** -- Pay once per year and save compared to the monthly rate Annual billing locks in your rate for the full year and simplifies budgeting. You can switch between monthly and annual billing from your Subscription Management page. --- ## Choosing the Right Plan When selecting a plan, consider: - How many chatbots you need to create - Your expected monthly message volume - How many training documents you plan to upload - The number of team members who need dashboard access Start with the plan that matches your current needs. You can upgrade at any time as your organization grows. --- ## Next Steps - [Managing Your Subscription](./7.2-managing-subscription.md) - [Addons](./7.3-addons.md) - [Tracking Your Usage](./7.4-usage-monitoring.md) - [Payments & Invoices](./7.5-payment-invoices.md) - [Billing FAQ](./7.6-billing-faq.md) --- # Managing Your Subscription View your plan details, upgrade or downgrade, and adjust your billing cycle from the Subscription Management page. --- ## Viewing Your Current Plan The Subscription Management page shows everything about your active subscription: - Your current plan name and tier - Whether you are on a monthly or annual billing cycle - Your next billing date and the amount that will be charged - Active addons attached to your subscription To access this page, go to **Settings** then **Subscription** in your dashboard. --- ## Upgrading Your Plan If you need more chatbots, higher message limits, additional storage, or access to more features, you can upgrade to a higher-tier plan at any time. **How to upgrade:** 1. Go to **Settings** then **Subscription** 2. Select **Change Plan** 3. Choose the plan you want to upgrade to 4. Review the pricing details 5. Confirm your upgrade Upgrades take effect immediately. Your new plan's features and higher limits are available right away. The price difference is prorated for your current billing cycle. --- ## Downgrading Your Plan If your current plan provides more capacity than you need, you can switch to a lower-tier plan. **How to downgrade:** 1. Go to **Settings** then **Subscription** 2. Select **Change Plan** 3. Choose a lower-tier plan 4. Review what changes with the new plan 5. Confirm your downgrade Downgrades take effect at the end of your current billing cycle. You continue to have full access to your current plan's features until that date. When the downgrade takes effect, your limits adjust to the new plan. If you exceed the new plan's limits (for example, more chatbots than allowed), some may be deactivated. --- ## Switching Billing Cycles You can switch between monthly and annual billing from the Subscription Management page. Annual billing offers a discounted rate compared to paying monthly. - **Switching to annual** -- You pay the annual amount and receive credit for any unused time on your current monthly cycle - **Switching to monthly** -- Typically available at your next annual renewal date --- ## Cancelling Your Subscription You can cancel your subscription at any time from the Subscription Management page. Your access continues until the end of your current billing period. After cancellation, your data is retained for a limited time, allowing you to resubscribe and restore your account. --- ## Enterprise Plans For organizations that need custom configurations, higher volume, or dedicated support beyond what standard plans offer, contact our team at support@adaptivetelehealth.com to discuss enterprise options. --- ## Next Steps - [Subscription Plans](./7.1-subscription-plans.md) - [Addons](./7.3-addons.md) - [Tracking Your Usage](./7.4-usage-monitoring.md) - [Payments & Invoices](./7.5-payment-invoices.md) - [Billing FAQ](./7.6-billing-faq.md) --- # Addons Extend your plan with additional features without upgrading to a higher tier. --- ## Live Agent Support -- $49/month Enable your team to handle live conversations directly with website visitors. When your chatbot encounters a question it cannot resolve or when a visitor requests human assistance, conversations are handed off to a live agent on your team. The Live Agent Support addon includes: - **Support Dashboard** -- A dedicated interface for your team to manage incoming conversations - **Conversation Queue** -- Incoming visitor requests are organized in a queue so your agents can respond in order - **File Sharing** -- Exchange files with visitors during live conversations - **Offline Messages** -- Visitors can leave messages when no agents are available, and your team can follow up later - **Visitor Ratings** -- Collect feedback from visitors after their support interaction - **Support Hours Scheduling** -- Define when live agent support is available so visitors see accurate availability ### How to Enable 1. Go to your subscription settings in the dashboard 2. Find the Addons section 3. Add the **Live Agent Support** addon 4. The addon activates immediately and is billed with your regular subscription For a complete guide on setting up and using Live Agent Support, see [What is Live Agent Support?](../part4-live-support/4.1-overview.md). --- ## Future Addons Additional addons will be made available as new features are developed. Check your subscription settings periodically to see any newly available options. --- ## Next Steps - [Subscription Plans](./7.1-subscription-plans.md) - [Managing Your Subscription](./7.2-managing-subscription.md) - [Tracking Your Usage](./7.4-usage-monitoring.md) - [Payments & Invoices](./7.5-payment-invoices.md) - [Billing FAQ](./7.6-billing-faq.md) --- # Tracking Your Usage Monitor your usage to stay within plan limits and avoid interruptions to your chatbot service. --- ## Usage Metrics Your dashboard tracks the following metrics so you can see how much of your plan you are using: - **Messages Sent** -- The total number of messages sent across all your chatbots during the current billing cycle - **Documents Uploaded** -- The number of training documents you have uploaded to train your chatbots - **Storage Used** -- The total storage consumed by your uploaded documents and training files - **Training Runs** -- The number of times you have trained or retrained your chatbots during the current billing cycle To view your usage, go to your dashboard and look for the usage details section. --- ## Understanding Plan Limits Each plan comes with specific limits for messages, documents, storage, and training runs. Here is how limits work: - **Limits are tied to your billing cycle.** Usage counters for messages and training runs reset on your billing cycle date each month or year. - **Document and storage limits are cumulative.** These reflect your total uploaded documents and storage at any point, not just what was added during the current cycle. - **Approaching your limits may affect chatbot functionality.** If you reach your message limit, your chatbots may stop responding to new visitor messages until the next billing cycle or until you upgrade. --- ## Staying Within Your Limits To make the most of your plan: - **Check your usage regularly** from your dashboard so there are no surprises - **Remove outdated documents** that are no longer relevant to free up storage and document slots - **Optimize your chatbot training** to improve response quality without unnecessary retraining - **Upgrade your plan** if you consistently approach or hit your limits -- this ensures uninterrupted service for your visitors --- ## When You Are Running Low If your usage is approaching your plan's limits, consider these options: 1. **Review your usage details** to understand which metric is close to the limit 2. **Remove unused content** such as outdated documents or inactive chatbots 3. **Upgrade to a higher plan** for increased capacity across all metrics You can manage your plan at any time from the [Subscription Management](./7.2-managing-subscription.md) page. --- ## Next Steps - [Subscription Plans](./7.1-subscription-plans.md) - [Managing Your Subscription](./7.2-managing-subscription.md) - [Addons](./7.3-addons.md) - [Payments & Invoices](./7.5-payment-invoices.md) - [Billing FAQ](./7.6-billing-faq.md) --- # Payments & Invoices Manage your payment methods, view past payments, and download invoices. --- ## Payment Methods ### Accepted Cards We accept **Visa** and **Mastercard** only. American Express and Discover are not currently supported. ### How Payments Are Processed All payments are processed securely through **CardPointe**. Your card details are encrypted and never stored on our servers. ### Adding or Updating Your Card To add a new payment card or update your existing one: 1. Go to the **Payment Methods** page in your dashboard 2. Enter your card number, expiration date, and CVV 3. Provide your billing address 4. Save your payment method If your card details change (new card number, updated expiration date), add the new card and remove the old one from the Payment Methods page. --- ## Payment History View all your past payments on the **Payment History** page in your dashboard. Each entry shows: - **Date** -- When the payment was charged - **Amount** -- The total amount charged - **Description** -- What the payment was for (plan subscription, addon, etc.) - **Status** -- Whether the payment was successful You can download individual invoices from the Payment History page for your records. --- ## Billing Information Keep your billing address and contact information up to date on the billing settings page. This information appears on your invoices. ### Automatic Payments Payments are charged automatically on your billing cycle date using the card on file. You do not need to manually pay each cycle. ### Failed Payments If a payment fails, we will retry the charge and send you an email notification. To avoid any interruption to your service, update your payment method as soon as possible if you receive a failed payment notice. --- ## Next Steps - [Subscription Plans](./7.1-subscription-plans.md) - [Managing Your Subscription](./7.2-managing-subscription.md) - [Addons](./7.3-addons.md) - [Tracking Your Usage](./7.4-usage-monitoring.md) - [Billing FAQ](./7.6-billing-faq.md) --- # Billing FAQ Answers to common billing and payment questions. --- ## How long is the free trial? All plans include a **14-day free trial**. Your card is validated during registration, but you will not be charged until the trial ends. --- ## When does billing start? Billing begins automatically **14 days after you complete registration**. You will be charged for your selected plan on that date. --- ## Can I cancel at any time? Yes. You can cancel your subscription at any time. Your access continues until the end of your current billing period. --- ## What payment methods do you accept? We accept **Visa** and **Mastercard**. American Express and Discover are not currently supported. --- ## How do I update my payment method? Go to **Payment Methods** in your dashboard to add or update your card information. --- ## Can I switch between monthly and annual billing? Yes. Switch from your Subscription Management page. Annual billing offers a discount compared to monthly. --- ## What happens if my payment fails? We will retry the payment and send you an email notification. Please update your payment method to avoid service interruption. --- ## Do you offer refunds? Contact our support team at support@adaptivetelehealth.com to discuss refund requests. --- ## Is there an enterprise plan? For custom enterprise plans with additional features and volume, contact support@adaptivetelehealth.com. --- ## How do I get a copy of my invoice? Visit **Payment History** in your dashboard to view and download invoices for any billing period. --- ## Is the BAA included? Yes. A Business Associate Agreement (BAA) is included with all plans at no additional cost. --- ## Next Steps - [Subscription Plans](./7.1-subscription-plans.md) - [Managing Your Subscription](./7.2-managing-subscription.md) - [Addons](./7.3-addons.md) - [Tracking Your Usage](./7.4-usage-monitoring.md) - [Payments & Invoices](./7.5-payment-invoices.md) --- # Data Security How your data is protected on the Adaptive Health AI platform. --- ## Infrastructure Adaptive Health AI is hosted on AWS SOC 2 Type II certified infrastructure. Our servers are located in the United States in a SOC 2 Type II certified data center that specializes in HIPAA compliance. Your data is protected by multiple layers of security, continuous monitoring, and strict access controls designed to meet the requirements of healthcare organizations. --- ## Encryption ### Encryption at Rest All stored data is protected with AES-256 encryption. This includes: - Chatbot conversations - Training documents - Lead and contact information - Account data - Backup copies ### Encryption in Transit All data transmitted between your browser, the chatbot widget, and our servers is protected with 256-bit SSL encryption. Every connection to the platform uses HTTPS, ensuring that data cannot be intercepted during transmission. ### Key Management Encryption keys are managed through a cloud-managed key encryption service. Keys are stored separately from data and rotated on a regular schedule. --- ## Data Isolation Each client organization's data is completely isolated from other clients. Your conversations, training documents, team information, and chatbot configurations are separated at the database level and cannot be accessed by other organizations on the platform. --- ## Audit Trails The platform maintains comprehensive audit trails that track all access and changes to your account. Every login, configuration change, document upload, and data access event is recorded with timestamps and user identification. See [Your Audit Log](./9.4-audit-logging.md) for details on what is tracked and how to review your logs. --- ## Backups Your data is backed up daily to an offsite secondary SOC 2 Type II certified data center. Backups are retained for 14 days. All backup data is encrypted both at rest and in transit between data center locations. --- ## Monitoring and Protection Our infrastructure is continuously monitored 24/7/365 by human security specialists. Security measures include: - **Multiple firewalls** configured for layered network protection - **IPS/IDS protection** to detect and prevent intrusion attempts - **Real-time monitoring** of all systems and network activity --- ## Redundancy Both our primary and backup data center locations are equipped with: - **Redundant internet connections** to maintain availability during network disruptions - **Redundant power** through diesel generators with 30-day fuel reserves, ensuring continued operation during power outages --- ## Questions About Security If you have questions about how your data is protected or need additional security documentation for your organization's evaluation, contact us at support@adaptivetelehealth.com. --- ## Related Documentation - [HIPAA Compliance](./9.2-hipaa-compliance.md) - [Privacy & Data Protection](./9.3-privacy-gdpr.md) - [Your Audit Log](./9.4-audit-logging.md) - [Security Best Practices](./9.5-security-best-practices.md) --- # HIPAA Compliance How the Adaptive Health AI platform supports your organization's HIPAA compliance. --- ## Understanding HIPAA and Software There is a lot of confusion about HIPAA compliance and software. Technically, software itself cannot be HIPAA-compliant because software is not a "Covered Entity." A covered entity is a person or an organization -- such as a healthcare provider, health plan, or healthcare clearinghouse. When we say our platform supports HIPAA compliance, we mean we maintain comprehensive administrative, physical, and technical controls that protect electronic Protected Health Information (ePHI) under the Final HIPAA Omnibus Rule. HIPAA compliance involves much more than encryption and a Business Associate Agreement. It is a comprehensive program of administrative, physical, and technological controls that work together to protect ePHI. Adaptive Health AI goes beyond what many other software companies do to support HIPAA security. The platform has passed extensive scrutiny from multiple state governments and healthcare organizations because of our administrative, physical, and technical controls, privacy policies, and security-minded corporate culture. --- ## Our Infrastructure Adaptive Health AI servers are located in the United States in a SOC 2 Type II certified data center that specializes in HIPAA compliance. Our servers are continuously monitored 24/7/365 by human security specialists and have multiple firewalls configured for added security. Servers are backed up daily to an offsite secondary SOC 2 Type II certified data center. Data in all servers containing ePHI is encrypted in transit and at rest. Both data center locations have redundant internet and redundant power (diesel generators with 30-day fuel reserves). --- ## Physical Security Access to our data center facilities requires multiple layers of verification: **Data Center Entry -- Dual-Factor Authentication:** - Prior authorization from management and placement on the approval list - An approved access code - Two forms of personal identification - Biometric fingerprint scanner verification **Security Monitoring:** - Visitor logging and auditing -- logbook entries must directly match video surveillance recordings - Video surveillance with logs retained for 90 days - Documented procedures for access by unannounced visit, phone call, or email - Annual third-party HIPAA audit with a 100% compliance rating --- ## Administrative Safeguards ### Compliance and Training - **Business Associate Agreement (BAA)** included with all plans -- there is no need to contact sales separately, it is standard - Required annual HIPAA staff training, assessment, and regular security reminders - Annual Risk Assessment conducted using the OCR Audit Protocol - Annual third-party data center HIPAA audit (passed with a 100% compliance rating) ### Policies and Procedures - Privacy Officer assigned with dedicated security responsibilities - Disaster preparedness and response plans, including contingency data access plans - Security incident procedures and Breach Notification Plan - Policies and procedures for information access controls (minimal use policy) - Regular risk evaluation, risk mitigation plans, and monitoring processes - Business Associate Agreement maintained with all contracted users --- ## Technical Security ### Access Controls and Authentication - Role-based access controls with unique user identification - Emergency access procedures - Automated logout after inactivity - Password requirements: minimum 8 characters including a symbol, uppercase letter, lowercase letter, and number ### Data Protection - AES-256 encryption at rest and 256-bit encryption in transit with integrity controls - Centralized logging with OS change management and patch management - IPS/IDS protection - Dual-factor VPN required for root access ### Backup and Recovery - Daily offsite backups with 14-day retention - Backup data encrypted at rest and in transit to the secondary site - Same security protections applied to backup data as primary data ### System Security - Antivirus and anti-malware software updated regularly - OS patch and change management procedures - Continuous system monitoring --- ## Business Associate Agreement A Business Associate Agreement (BAA) is included with all Adaptive Health AI plans. You do not need to contact sales or request a special plan to receive a BAA -- it is provided as standard. The BAA establishes: - How ePHI will be handled and protected - Security safeguard commitments - Breach notification procedures - Permitted uses and disclosures - Subcontractor requirements --- ## PHI in Chatbot Conversations Visitors to your chatbot may share health-related information during conversations. To minimize unnecessary ePHI collection, consider configuring your chatbot's AI behavior settings to direct visitors to contact your office directly for detailed medical questions. See [AI Behavior & Guardrails](../part2-chatbot-config/2.8-ai-behavior.md) for instructions on configuring safety constraints and response behavior. --- ## Your Compliance Responsibilities While Adaptive Health AI maintains the infrastructure and technical controls described above, your organization remains responsible for: - Properly configuring your chatbot to minimize unnecessary ePHI collection - Managing team member access with appropriate permissions - Training your staff on HIPAA requirements - Maintaining your own compliance documentation - Reporting any suspected security incidents promptly --- ## Need Assistance? If you have questions about HIPAA compliance or need assistance with the provider side of HIPAA compliance, contact us at support@adaptivetelehealth.com. --- ## Related Documentation - [Data Security](./9.1-data-security.md) - [Privacy & Data Protection](./9.3-privacy-gdpr.md) - [Your Audit Log](./9.4-audit-logging.md) - [Security Best Practices](./9.5-security-best-practices.md) - [AI Behavior Configuration](../part2-chatbot-config/2.8-ai-behavior.md) --- # Privacy & Data Protection How the Adaptive Health AI platform handles privacy and protects your organization's data. --- ## Privacy Policy Acceptance All users must accept the privacy policy and terms of service during account registration. This acceptance is tracked and recorded for compliance purposes. Each user's acceptance is tied to their account with a timestamp. --- ## Data Isolation Each client organization's data is completely isolated from other clients on the platform. Your conversations, training documents, team member information, and chatbot configurations are separated at the database level. No other organization can access your data, and you cannot access theirs. --- ## Consent Management Privacy policy and terms of service acceptance is tracked for all users in your organization. When team members register for an account, their acceptance of these policies is recorded and maintained. --- ## Data Export If you need to export your organization's data, contact us at support@adaptivetelehealth.com. Our support team will work with you to provide the data you need in an appropriate format. --- ## Data Retention Data is retained according to HIPAA requirements to support healthcare compliance. If you have questions about specific retention policies or need to discuss retention requirements for your organization, contact support@adaptivetelehealth.com. --- ## Data Deletion If you are closing your account or need to request deletion of your organization's data, contact support@adaptivetelehealth.com. Our team will guide you through the process and confirm when deletion is complete. --- ## Your Privacy Responsibilities As the chatbot owner, you are responsible for: - Maintaining your own privacy policy for your website visitors - Ensuring your chatbot usage complies with applicable privacy regulations - Informing your visitors about how their data may be used - Responding to any privacy-related inquiries from your visitors --- ## Questions About Privacy If you have questions about how your data is handled or need additional information about our privacy practices, contact us at support@adaptivetelehealth.com. --- ## Related Documentation - [Data Security](./9.1-data-security.md) - [HIPAA Compliance](./9.2-hipaa-compliance.md) - [Your Audit Log](./9.4-audit-logging.md) - [Security Best Practices](./9.5-security-best-practices.md) --- # Your Audit Log Track and review all activity within your organization's account. --- ## What Is Tracked The platform records the following events for your organization: - **User logins and logouts** -- every time a team member signs in or out - **Failed login attempts** -- unsuccessful login attempts against your accounts - **Data access events** -- when team members access conversations, documents, or other data - **Configuration changes** -- updates to chatbot settings, widget customization, and other configuration - **Document uploads and deletions** -- when training documents are added or removed - **Team member additions and removals** -- when users are added to or removed from your organization - **Permission changes** -- when team member roles or access levels are modified --- ## Accessing Your Audit Logs To review your organization's audit logs: 1. Navigate to the **Audit Logs** page from your dashboard menu 2. Browse the list of recorded events 3. Use filters to narrow down by date range, user, or event type Each log entry includes when the event occurred, who performed the action, what was done, and what was affected. --- ## Log Retention All audit logs are retained for the HIPAA-required 6-year period. This applies to all plans -- there are no plan-based retention tiers. Every organization receives the same retention period regardless of their subscription level. --- ## Using Your Audit Logs ### Compliance Audit logs provide the documentation you need for compliance audits by demonstrating: - Who accessed what data and when - What changes were made to your configuration - That appropriate access controls are in place ### Security Monitoring Review your audit logs regularly to identify: - Unexpected login activity - Configuration changes you did not authorize - Unusual data access patterns - Failed login attempts that may indicate unauthorized access attempts ### Troubleshooting Audit logs can help you trace when a configuration change was made, identify who made it, and understand the sequence of events when investigating issues. --- ## Related Documentation - [Data Security](./9.1-data-security.md) - [HIPAA Compliance](./9.2-hipaa-compliance.md) - [Privacy & Data Protection](./9.3-privacy-gdpr.md) - [Security Best Practices](./9.5-security-best-practices.md) - [Securing Your Account](../part6-team-account/6.4-account-security.md) --- # Security Best Practices Practical tips for keeping your organization's account and data secure. --- ## Enable Two-Factor Authentication Require all team members to enable two-factor authentication (2FA) on their accounts. This adds an additional layer of protection beyond passwords and significantly reduces the risk of unauthorized access. See [Securing Your Account](../part6-team-account/6.4-account-security.md) for setup instructions. --- ## Manage Team Permissions Assign the minimum necessary permissions to each team member. Use Viewer profiles for team members who only need to monitor chatbot activity, and reserve Admin profiles for those who need full control over configuration and settings. See [Team Permissions](../part6-team-account/6.2-roles-permissions.md) for details on available roles. --- ## Review Audit Logs Regularly review your audit logs to monitor account activity. Look for unexpected logins, configuration changes you did not authorize, or unusual access patterns. Catching suspicious activity early helps prevent security incidents. See [Your Audit Log](./9.4-audit-logging.md) for details on accessing and using your logs. --- ## Use Strong Passwords Enforce strong passwords for all team members. The platform requires a minimum of 8 characters including a symbol, uppercase letter, lowercase letter, and number. Encourage team members to use unique passwords that are not shared with other services, and to use a password manager to keep track of them. --- ## Understand Session Timeouts The platform automatically logs out inactive users to protect your account. Ensure your team members are aware of this behavior and save their work regularly. If a session expires, simply log back in to continue. --- ## Keep Training Data Secure Only upload documents that are appropriate for your chatbot to reference. Remember that chatbot visitors may be able to access information from your training documents through their questions. Review your uploaded documents periodically and remove any that are outdated or contain information that should not be available to visitors. --- ## Monitor Chatbot Conversations Regularly review conversations in the Conversations tab to ensure your chatbot is providing accurate and appropriate responses. If you find responses that need correction, create Q&A overrides to ensure the chatbot gives the right answer in the future. --- ## Contact Support for Security Concerns If you notice any suspicious activity on your account or have security concerns, contact us immediately at support@adaptivetelehealth.com. Prompt reporting helps us investigate and resolve potential issues quickly. --- ## Related Documentation - [Data Security](./9.1-data-security.md) - [HIPAA Compliance](./9.2-hipaa-compliance.md) - [Privacy & Data Protection](./9.3-privacy-gdpr.md) - [Your Audit Log](./9.4-audit-logging.md) - [Securing Your Account](../part6-team-account/6.4-account-security.md) - [Team Permissions](../part6-team-account/6.2-roles-permissions.md) --- # Chatbot Best Practices Practical tips for getting the best results from your chatbot. --- ## Training Content Quality The quality of your chatbot's responses depends directly on the quality of the content you provide. Follow these guidelines to build a strong knowledge base: - **Upload clear, well-written documents** that cover your key topics. The chatbot can only be as good as the information it has to work with. - **Keep content up to date** and remove outdated information. Old or inaccurate documents can lead to incorrect responses. - **Start with your most common questions** and the information visitors ask about most. You can expand coverage over time. - **Use multiple training formats** for the best results: - **Documents** for detailed content like policies, service descriptions, and guides - **Website Crawler** for pulling in content directly from your existing website - **Q&A Overrides** for exact answers to specific questions --- ## Using Q&A Overrides Effectively Q&A Overrides give you direct control over how your chatbot answers specific questions. They take priority over document-based responses. - **Create overrides for critical questions** where accuracy is essential: pricing, business hours, contact information, and policies. - **Write questions the way your visitors would ask them.** Use natural, everyday language rather than formal or technical phrasing. - **Keep answers concise and helpful.** Visitors want quick, clear information. - **Review and update regularly** as your information changes. Outdated overrides can be worse than no override at all. See [Q&A Overrides](../part3-training/3.4-qa-training.md) for detailed setup instructions. --- ## Widget Placement Where and how your chatbot appears on your website affects how many visitors use it. - **Place your chatbot on pages where visitors need help most** -- service pages, pricing pages, and contact pages are great starting points. - **Choose your widget position carefully.** Bottom-right is the most common and familiar placement for visitors. - **Use the welcome popup** to proactively engage visitors. A friendly greeting can encourage people to ask questions they might otherwise leave the site without asking. - **Configure suggested questions** to give visitors easy starting points. Choose questions that address your most common topics or guide visitors toward key actions. --- ## AI Behavior Tuning Your chatbot's personality and response style can be customized to match your brand and your visitors' expectations. - **Choose the right personality** for your brand. Professional works well for healthcare and financial services. Friendly is great for retail and hospitality. - **Select the appropriate purpose** to guide how the chatbot focuses its responses, whether that is customer support, lead generation, or general information. - **Use response style settings** to control answer length. Some audiences prefer brief, direct answers while others want more detailed explanations. - **Enable safety constraints** appropriate for your industry. Healthcare organizations, for example, should ensure the chatbot does not provide medical advice. See [AI Behavior & Guardrails](../part2-chatbot-config/2.8-ai-behavior.md) for all available settings. --- ## Using Conditional Buttons Conditional Buttons let your chatbot display clickable action buttons based on what the visitor is asking about. - **Set up buttons for common actions** like scheduling appointments, visiting your pricing page, or contacting your sales team. - **Choose the right trigger type:** - Use **keyword triggers** for predictable, straightforward questions (e.g., "pricing" or "schedule") - Use **AI context triggers** for more nuanced situations where the chatbot needs to understand intent - **Prioritize your most important buttons** by assigning higher priority numbers so they appear first when multiple buttons match. --- ## Lead Capture Optimization The Lead Capture Form helps you collect visitor information so you can follow up after conversations. - **Enable the fields most relevant to your business.** Only ask for what you actually need -- shorter forms get more completions. - **Make email required** to ensure you have a way to follow up with every lead. - **Use a clear, inviting form title and description** that explains why you are asking for their information and what they will get in return. - **Set the form to appear at the right time** in the conversation. Showing it too early can feel pushy; too late and the visitor may have already left. --- ## Testing with Sandbox The Sandbox lets you test your chatbot's behavior without affecting your live website. Make it a regular part of your workflow. - **Always test in the Sandbox after making changes** to training content, Q&A Overrides, or configuration settings. - **Ask questions you expect your visitors to ask.** Try different phrasings to make sure the chatbot handles variations well. - **Verify Q&A Overrides are working correctly** by asking the exact questions you created overrides for. - **Test conditional buttons** to confirm they trigger at the right times and link to the correct destinations. - **Check widget appearance and behavior settings** to make sure everything looks and works the way you want before deploying changes. --- ## Quick Links - [Common Issues](./10.2-common-issues.md) - [Troubleshooting Guide](./10.3-troubleshooting.md) - [Getting Help](./10.4-getting-help.md) - [AI Behavior & Guardrails](../part2-chatbot-config/2.8-ai-behavior.md) --- # Common Issues Quick solutions to frequently encountered problems. --- ## Widget Not Appearing on My Website If the chat widget is not showing up on your website, work through these checks: - **Verify your chatbot is set to "Active"** in the chatbot management page. An inactive chatbot will not load on any website. - **Check that the embed code is placed correctly** on your page. It should be placed just before the closing `` tag in your website's HTML. - **Make sure you are using the correct embed code** from the Deploy tab. If you have multiple chatbots, each one has its own unique embed code. - **Try clearing your browser cache** and refreshing the page. Cached versions of your site may not include the latest embed code. - **Test in an incognito or private browser window** to rule out browser extensions that might be blocking the widget from loading. --- ## Chatbot Giving Wrong or Irrelevant Answers If your chatbot is providing incorrect or off-topic responses: - **Add Q&A Overrides** for questions that need specific, exact answers. Overrides take priority over document-based responses and give you direct control. - **Upload additional training documents** covering the topic. The chatbot may not have enough information to answer correctly. - **Remove outdated or contradictory training documents.** If two documents provide conflicting information on the same topic, the chatbot may give inconsistent answers. - **Check if the website crawler pulled in irrelevant pages.** Review your crawled content and remove any pages that are not useful for your chatbot. - **Adjust the AI response style setting** if answers are too long or too short. You can control answer length in your chatbot's AI Behavior settings. - **Test in the Sandbox** to verify your improvements are working before they go live. --- ## Training Not Taking Effect If you have uploaded documents but the chatbot does not seem to use them: - **Check document status in the Training tab.** Make sure all documents show "Completed" or "Trained" status. Documents still processing are not yet available to the chatbot. - **Retry failed documents** using the retry button next to any document that shows an error status. - **Give the system a few minutes** to process after uploading new documents. Larger documents take longer to train. - **Make sure documents contain readable text.** Scanned PDFs that are just images, or documents with very little actual text content, may not process successfully. --- ## Lead Capture Form Not Showing If visitors are not seeing the Lead Capture Form: - **Verify the form is enabled** in Settings > Advanced > Lead Capture Form. The form must be toggled on to appear. - **Check that at least one field is enabled.** The form will not display if no fields are configured to show. - **Ensure the form position setting is correct.** Review when the form is set to appear during the conversation. - **Test in the Sandbox** to see the form behavior firsthand and confirm it triggers as expected. --- ## Widget Styling Looks Wrong If the widget appears but does not look right: - **Check your theme setting** (Light or Dark) to make sure it matches what you expect. - **Verify button and header colors** in the Widget Appearance settings. A recent change may have overridden your preferred colors. - **Ensure custom logos are uploaded in the correct format.** Logos should be PNG or JPG images sized appropriately for the widget header. - **Test with the live preview** in the Settings tab to see exactly how the widget will look to your visitors. --- ## Conversations Not Appearing in Analytics If your analytics data seems incomplete or missing: - **Analytics may take a few minutes to update.** Recent conversations will not appear instantly in reports. - **Check the date range filter.** It may be set to a range that excludes your most recent conversations. - **Use the refresh button** to update the analytics display with the latest data. - **Ensure the chatbot is active and receiving traffic.** If the chatbot is inactive or the embed code is not on your website, there will be no conversations to display. --- ## Live Agent Support Not Working If visitors cannot connect with live agents: - **Verify the addon is enabled** in your subscription. Live Agent Support is an optional feature that must be activated. - **Check that team members have toggled to "Online" status.** Agents must be online for visitors to be routed to them. - **Verify support hours are configured correctly** for your timezone. Visitors outside of configured support hours will see the offline behavior instead. - **Check the offline behavior setting.** If it is set to hide the chat option, visitors will not see a way to reach agents outside of support hours. --- ## Quick Links - [Troubleshooting Guide](./10.3-troubleshooting.md) - [Getting Help](./10.4-getting-help.md) - [Chatbot Best Practices](./10.1-chatbot-best-practices.md) - [Deployment](../part2-chatbot-config/2.10-deployment.md) --- # Troubleshooting Guide A step-by-step diagnostic process to help you identify and resolve issues with your chatbot. --- ## Step 1: Verify Chatbot Status Start by confirming your chatbot is active and properly configured. - Go to your chatbot management page. - Check the Active/Inactive toggle and make sure it is set to **Active**. - Note the **Bot ID** displayed on the page. You will need this if you contact support. If the chatbot is inactive, toggle it to Active and check if that resolves your issue. --- ## Step 2: Check Embed Code Make sure the correct embed code is installed on your website. - Go to the **Deploy** tab in your chatbot management page. - Copy the latest embed code. - Verify it is placed correctly on your website, just before the closing `` tag. - Confirm that the **Bot ID** in the embed code matches the Bot ID shown on your chatbot management page. If the embed code is missing or outdated, replace it with the latest version from the Deploy tab. --- ## Step 3: Test in Sandbox The Sandbox lets you test your chatbot without needing to visit your website. - Go to the **Sandbox** tab in your chatbot management page. - Try sending messages and asking the kinds of questions your visitors would ask. - If the Sandbox works correctly but your website does not, the issue is likely with the embed code placement on your site, not with the chatbot itself. - If the Sandbox also shows problems, the issue is with your chatbot configuration or training content. Continue to the next steps. --- ## Step 4: Review Training Status Check that your training content has been processed successfully. - Go to the **Training** tab. - Check that all documents show a successful status such as "Completed" or "Trained." - If any documents show a failed status, use the retry button to reprocess them. - Verify that website crawler results are complete if you are using the crawler. - Review your Q&A Overrides for accuracy and make sure they cover your most important questions. --- ## Step 5: Check Widget Configuration Review your widget settings to make sure everything is configured correctly. - Go to **Settings > Advanced > Widget Appearance**. - Verify the widget position, colors, and theme settings match your preferences. - Check that the welcome popup is configured the way you want it. - Review the Lead Capture Form settings if you are using that feature. - Confirm that any conditional buttons are set up with the correct triggers and destinations. --- ## Step 6: Review Conversation Logs Look at recent conversations to identify patterns. - Go to the **Conversations** tab. - Look at recent conversations to see if the chatbot is responding at all. If there are no responses, the issue may be a connection problem. If the chatbot responds but with incorrect information, the issue is with training content. - Note any questions that the chatbot is struggling with. - Create Q&A Overrides for any questions that consistently get incorrect or unhelpful responses. --- ## Browser-Specific Tips If you are experiencing issues viewing your chatbot on your website, try these browser-level checks: - **Clear your browser cache and cookies.** Cached files can prevent the latest version of the widget from loading. - **Try in an incognito or private browsing window.** This rules out interference from browser extensions, saved cookies, or cached data. - **Check the browser console for errors.** Right-click anywhere on the page, select Inspect, then click the Console tab. Look for any red error messages related to the chatbot. - **Ensure JavaScript is enabled** in your browser settings. The chatbot widget requires JavaScript to function. - **Try a different browser** to determine if the issue is specific to one browser. Testing in Chrome, Firefox, Safari, or Edge can help narrow down the problem. --- ## Still Need Help? If these steps do not resolve your issue, contact **support@adaptivetelehealth.com** with the following information: - Your chatbot's **Bot ID** - A **description of the issue** and when it started - **Screenshots** if possible, including any error messages - The **browser and device** you are using - What troubleshooting steps you have already tried Including this information helps the support team diagnose your issue faster. --- ## Quick Links - [Common Issues](./10.2-common-issues.md) - [Getting Help](./10.4-getting-help.md) - [Chatbot Best Practices](./10.1-chatbot-best-practices.md) - [Deployment](../part2-chatbot-config/2.10-deployment.md) --- # Getting Help Resources available to help you get the most out of your chatbot. --- ## Documentation You are already here! This documentation covers every feature of the platform, from initial setup to advanced configuration. Use the search bar and navigation menu to find answers about any topic. Whether you are setting up your first chatbot or fine-tuning AI behavior settings, the documentation is the fastest way to find step-by-step instructions. --- ## Sandbox Testing The Sandbox tab in your chatbot management page lets you test changes before they go live on your website. Use it to: - Verify that new training content produces the right answers - Confirm Q&A Overrides are working as expected - Test configuration changes to AI behavior, widget appearance, and other settings - Check that conditional buttons trigger correctly Testing in the Sandbox first helps you catch issues before your visitors encounter them. --- ## Email Support Contact our support team at **support@adaptivetelehealth.com** for help with: - **Technical issues and troubleshooting** when the documentation and self-service steps have not resolved your problem - **Account and billing questions** about your subscription, invoices, or plan changes - **Feature requests and feedback** to let us know what would make the platform more useful for you - **Security concerns** if you notice anything unusual with your account or chatbot - **HIPAA compliance questions** about how the platform handles protected health information When contacting support, include your chatbot's Bot ID, a description of the issue, and screenshots if possible. This helps the team resolve your issue faster. --- ## Troubleshooting Guide For step-by-step diagnostics when something is not working as expected, check the [Troubleshooting Guide](./10.3-troubleshooting.md). It walks you through a structured process to identify and resolve common problems, from verifying chatbot status to reviewing conversation logs. --- ## Common Issues See [Common Issues](./10.2-common-issues.md) for quick solutions to frequently encountered problems, including widget display issues, incorrect chatbot answers, training problems, and more. --- ## Best Practices Review [Chatbot Best Practices](./10.1-chatbot-best-practices.md) for tips on training content quality, widget placement, AI behavior tuning, lead capture optimization, and testing strategies that help you get the most out of your chatbot. --- ## Quick Links - [Chatbot Best Practices](./10.1-chatbot-best-practices.md) - [Common Issues](./10.2-common-issues.md) - [Troubleshooting Guide](./10.3-troubleshooting.md) - [Platform Overview](../part1-getting-started/1.1-platform-overview.md) ---